Minox Scanning Report

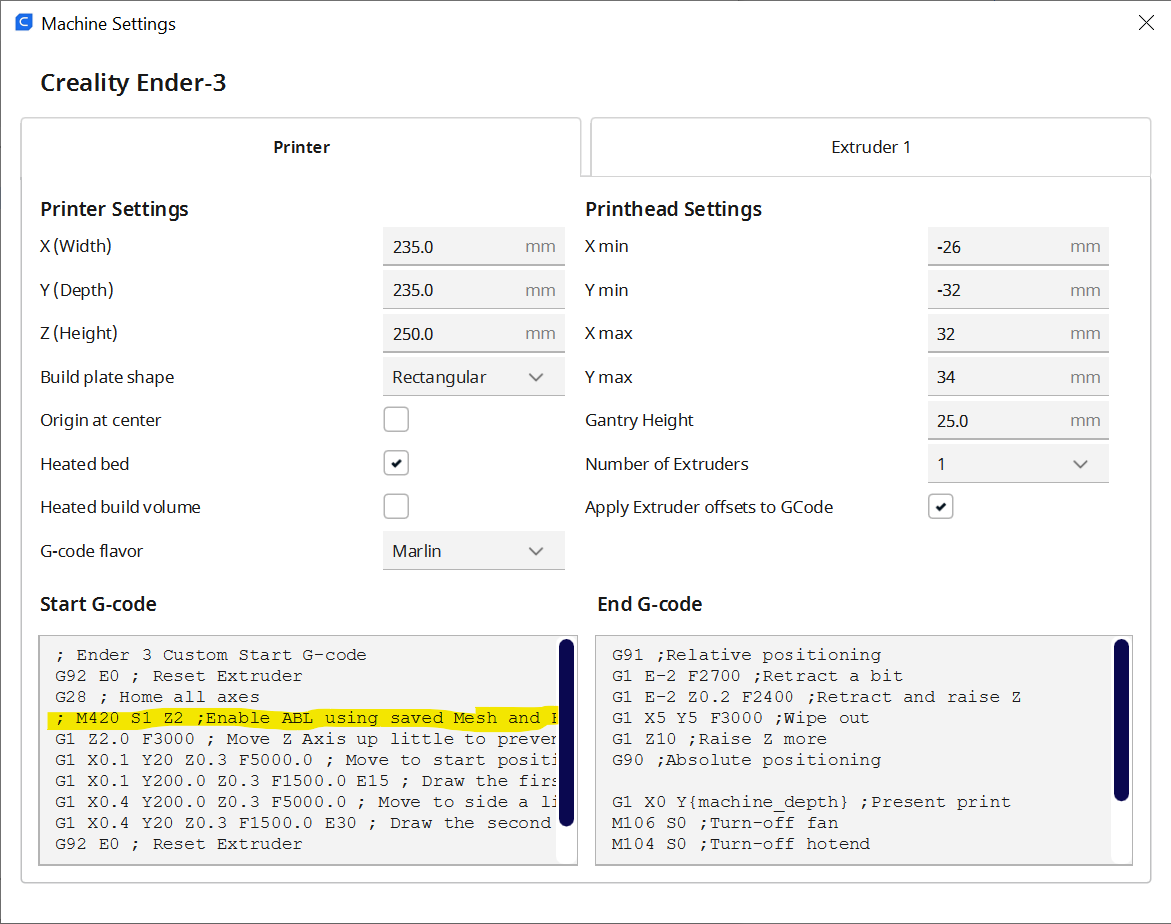
The height steps are in .2mm because that’s the print layer height

The story so far: “Rob has become mildly obsessed with getting the best possible results scanning the tiny negatives produced by his Minox camera. He’s 3D printed a holder for his scanner which had different negative heights. The idea is to scan a negative and determine which height works best”. Now read on…

It wasn’t taken for testing, but it works really well

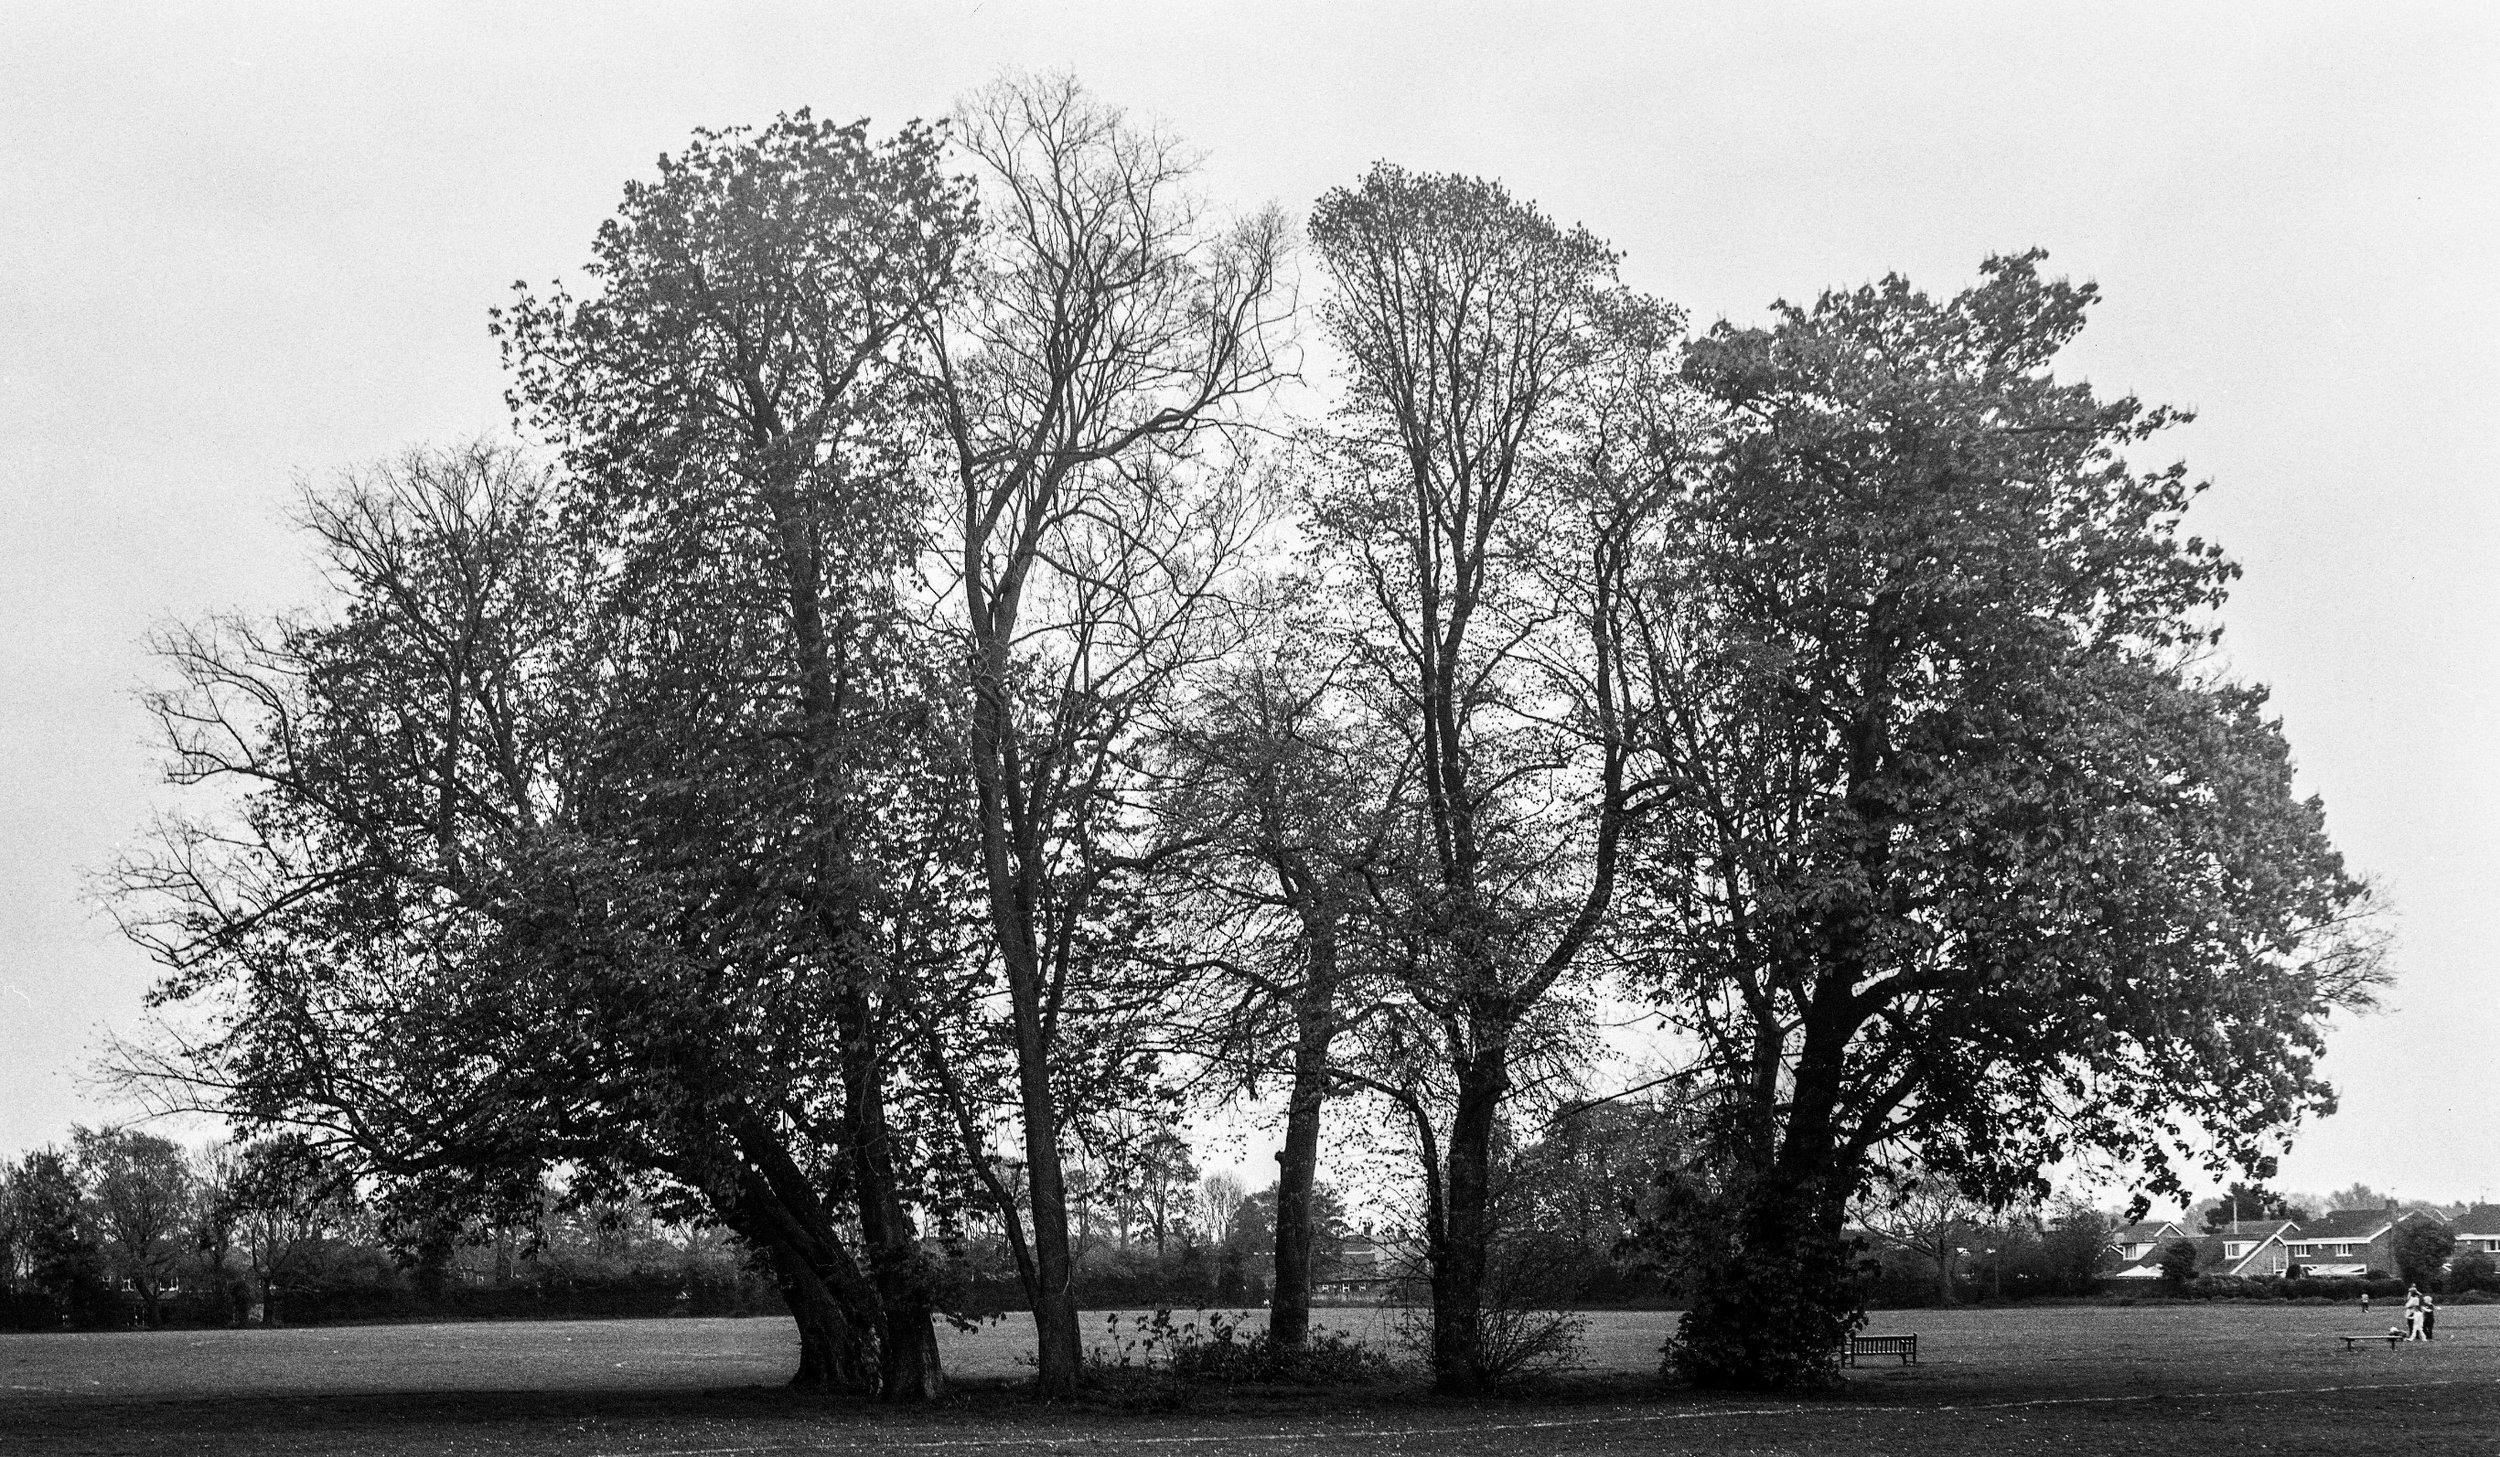
I took the picture above down at “the dock” in Hull. It is of the C4DI building and a tiny bit of the tidal barrier. The railings going off into the distance are a very good test for resolution. I used my “different height scanner thingy” (really must think of a better name) and got the following results:

A print of the entire image at this magification would be around 24 inches or so across

It was interesting to see the difference that 0.2mm height makes to the image quality. The best way to see it is to look at the lamppost at the end of the walkway. That is better defined against the background in the -0.2mm height scan. The next thing to do is to print a complete scanning frame for that height.

Next Hardware Meetup is all about 3D printing

YOu could have one of your very own….

We’re having our next Hardware Meetup in Hull library in the Makerspace on Wednesday 1st November starting at 5:30pm. It’s all about 3D printing. There’s an exhibition of 3D printing on at the Makerspace at the moment and lots of stuff worth looking at, whether you own a printer or are thinking of getting one.

It would be lovely to see you there. If you have something you’ve printed that you want to show off, bring it along. There will be a small (3D printed) prize for the object that everyone likes the most. I’ll be talking about the fun you can have making 3D printable objects from Python code - which is something of a thing for me.

We’ll also have free tags of fun to give away, and we might have a Tag Joust championship. It would be lovely to see you there.

If you are around earlier on Wednesday I’m going to be in the Makerspace fiddling with stuff for the entire afternoon if you want to drop round for a chat about hardware.

3D printing exhibition at Hull MakerSpace

This picture was taken with my 3D printed film camera

Today I went down to Hull MakerSpace to hand over some bits and bobs for an exhibition of 3D printing. Lee-Ann is organising the display and some events to make folks more aware of what 3D printing can do. I’ve contributed a Hull Pixelbot, some Connected Little Boxes, tags of fun and a few other things. If you’re in Hull over the next few weeks you can take a look at the stuff. There are some amazing printed models using some fantastic types of filament. Great fun.

Using OctoPrint without a bed sensor

The line you want to comment out is highlighted

This is a rather selfish post, in that it is here so that I can find it in my blog if I need to do it again. Although if you’ve just tried to use OctoPrint and had the print fail because of a “Bed Levelling Not Enabled” error you might find it useful…

Anyhoo, a while back I disabled the bed level sensor on my printer, what with its habit of bashing the print head into the print bed every now and then. I decided that I could manage without automatic bed levelling and things have been going fine. I’ve been copying my print files onto an SD card and plugging it into the printer. But today I decided to reconnect my OctoPrint server. This is useful because it means I can print directly from my computer rather than hopping around with memory cards. But it didn’t work. OctoPrint kept shutting down the printing with an error.

I eventually tracked down the problem, and it wasn’t OctoPrint. It’s just that OctoPrint cares when the printer sends out an error message, whereas if you print from a memory card all printer errors are ignored.

The problem is with Cura, the program I use to convert my designs into code files that control the printer. Cura adds a header of instructions to the printer code file. One of these was asking the printer to turn on bed levelling. The printer complains it hasn’t got bed levelling, sends out an error message and OctoPrint stops the print. The solution is just to comment out the M420 statement that does this, as you can see above. To get to this menu you use Settings>Printer>Manage Printers>Machine Settings

Lensboard a gogo

This makes the camera a lot more useful…

Today, after a trip to the dentist for a filling (am I the only person who gets to the dentist half an hour early?), it was time to print yesterday’s lensboard design for my Micro-Press camera. It just fitted. I’m very pleased with myself, even though it was actually a pretty simple design. The board seems quite light-tight and my test pictures came out fine.

The hardest part of the job was finding where I’d put my black filament - the board nearly ended up being printed in shocking pink.

I might do another one with higher infill. This will make it slightly heftier and even more lighttight, but the camera was quite usable with the first version I printed. I’ll put the design on Thingiverse later for those many readers of my blog who have a need for a lensboard for a 1950’s Micro-Press press camera.

Making a lensboard

I already had some code that made rounded cornered plates

One of the truly great things about having a 3D printer is that if you have a need for something you can just print one. My “auction packed” camera arrived last week and today I thought I’d pop a lens in it so that I can try taking some pictures. For these type of cameras the lens is mounted on a plate called a “lensboard” which is then fitted into the camera. This makes it much easier to swap lenses when you are out and about. The camera didn’t come with a lens, but it did have a lensboard.

Unfortunately it was the wrong size. The hole in the middle was too big for the lens I wanted to use. So, I decided to make my own lensboard. I’ve made a quick version in OpenScad and tomorrow I’ll print it out and discover just how wrong it is.

Bye bye BLTouch

It seems we are not quite out of the woods yet…..

I was showing off my 3D printer last week and it promptly buried its head in the print bed and dragged it around. Wonderful.

I’ve had this problem for a while. The BLTouch sensor on my machine has got very unreliable. This is the little probe that tells the printer when the had is close to the bed. Or not.

Anyhoo, I’ve spent the afternoon removing it. I’ve been manually adjusting the print height for years and I don’t mind doing it again. I’ve loaded up the Jyers firmware which has a very nice automated levelling function which moves the head to the different corners so you can set it up by hand. This works very well. Now all I need to do is solve the bed adhesion problem I had while printing some more Tags of Fun. The good news is that the print quality is excellent. The bad news is that half way through the print process the thing I’m printing tends to want to go off for a walk…..

3D Printing Rule 0

This is the most important rule for anyone with a 3D printer.

Never start to think of your 3D printer as an appliance.

My printer has been behaving very well of late. So well that I’ve started thinking it is something I can switch on and it will just work. Silly me. This morning I started a print and it promptly embedded the print head in the bed - necessitating a bunch of re-alignment and fiddling to get it back working again. Lesson learned.

3D Printed Camera article now in Hackspace magazine

One of the funnest articles I’ve written

The article about my 3D printed camera is now in HackSpace magazine, which you can find in all good newsagents. There’s lots of great stuff in there along with my few pages. If you fancy making a camera like this you can find the designs and lots of useful stuff here.

The camera is now light tight and works a treat

I took the picture above with the 3D printed camera. The amount of detail in the branches is very impressive.

Thick Printing

This is the newly printed left hand version of the chord keyboard.

I’m printing some items for a HackSpace magazine article. This one is about making a Bluetooth version of the chord keyboard I made a while back. Today I printed the top of the left handed version of the keyboard. I’ve thickened up the top plate quite a lot. This has done a few things to the print job; perhaps the most notable thing is that it now takes over 6 hours to print. However, it has also added a really nice bit of extra “heft” to the keyboard.

Lots of things benefit from a bit of extra weight, and this is one of them. Up until now I’ve usually printed the thinnest structures I can get away with to save time and filament. However, I think from now on I’ll live with the extra time and cost and print things a bit thicker.

3D printed camera is now light - tight

I’m actually very happy with this picture

The picture above was taken using my 3D printed camera. The lack of any light on the image is actually very pleasing. While the film was in the camera I took it outside, shone torches and bright lights on it and generally waved it around in the brightest areas I could find. And the picture came out completely black. Which means I think that after a whole of of painting and masking it is now light tight.

I’m going to put a spirit level on the camera so I can tell when it is level…

I took the camera out for a walk and came back with this, which I’m quite happy with.

Importing STL files into FreeCAD

One of the light leaks in my leaky camera was because the lens mount had some mounting holes in it that I’m not using. These made for some thinly printed areas which let light in. I wanted to make a modified version of the part without the holes and with a slightly larger lens opening. The problem was that I only had the file as an STL file, not in something that can be edited using FreeCAD. However, it turned out to be quite easy to import the design and then convert it into a FreeCAD model. The first thing you do is use the import dialog to bring in the STL file, select the loaded mesh and switch to the Part workbench and use the commands Part->Create Shape from mesh and then Part->Covert to solid. After that you can work with the part as you would any other.

Remember to convert at the highest possible resolution

This is powerful magic, as it means you can take any STL mesh and work with it. I’ve put the procedure in the blog so that I know where to look when I need to do it again……

Fixing a leaky camera

The hair is probably one of mine. I need a haircut.

My 3D printed camera leaks light. It works perfectly fine indoors but take it out into the sunlight and things go badly wrong. The pictures have an “other worldly” quality but I’m not always going for that. Number one son suggested that I wait until it gets dark, put a powerful light inside the camera (there’s plenty of room) and then see where the leaks are. The first discovery was that some of my black painted areas were not very black. So yesterday I spent some time painting my hands, trousers, shoes and camera with more black paint. The paint ran out to the point where the spay only worked when held vertically, so I had to hold things in front of the nozzle to paint the bits that needed an extra coat. Hence my attack of “black fingernail”.

Tonight I spent a happy half hour in the dark looking for leaks and applying copious amounts of black tape to leaky joints in the camera. I think it is mostly light tight now.

Laser Rangefinders are cool

A while back I ordered an awesome little laser rangefinder. It arrived last week and I’ve found an excellent holder for it which I can use on my 3D printed camera. I printed the holder this morning and above you can see my fully tricked out camera. It has a viewfinder, level and now a range finder. It might only be able to take one picture at a time, but it certainly looks the part.

3D Printing at an angle

Followers of my blog (yes, that’s both of you) will have been observing the fun and games I’ve been having trying to print a handle for my 3D printed camera. The problem is that if you print the handle vertically there is only a small surface in contact with the print bed. As the printing gets higher the print head becomes more and more likely to push the workpiece off the print bed. When it does you get a tree.

I tried printing with the handle flat on the print bed, but that caused other problems. There is a large open gap for the cable release that runs the length of the handle. This can’t be printed without extra support and the support material proved impossible to remove. I ended up with a handle that was solid all the way through So, in the end I tried something I’ve not done before. I tipped the whole workpiece by 45 degrees. This removed the need for any internal support.

Above you can see how it works. The gap in the middle of the handle doesn’t need support and there is now a huge area of the workpiece in contact with the print bed so it grips really well. It worked a treat. The support came off very easily and left a surprisingly smooth finish all over the handle

If you’ve got something that needs internal support you might like to try the same thing. I used Cura to slice the model and the print preview (you can see it above) to check for any overhangs.

This might be a good technique for printing very small things, as it provides a larger base. It also removes any problems with the workpiece lifting up from the bed on the corners, which can be an issue when you try to print large objects.