Sensors Shipped
/
Sensor02, along with three siblings, has been shipped to Hull City Council. Next stop a lamppost in the Hull area followed, hopefully, by a stream of air quality readings. Eventually the readings will show up here.
Sensor02, along with three siblings, has been shipped to Hull City Council. Next stop a lamppost in the Hull area followed, hopefully, by a stream of air quality readings. Eventually the readings will show up here.
I’m upgrading the Air Quality sensor software so that I can send configuration messages over LoRa to the sensor. The thing I’m most interested in is the ability to tell the sensor the rate at which it should send readings. It would be useful to have a message sent every five minutes or so for testing, and then dial back the rate once the sensor has been installed. I’m using a tiny packet format to do this. The packet is three bytes long:
01 58 02
The first byte is the command number (there is only one command at the moment). The other two bytes are the number of seconds the sensor should wait between sending each reading. The value I want to send won’t fit into a single byte (a byte can represent an unsigned integer up to the value 255 and I want to have intervals longer than 255 seconds) so I’m using two bytes. The first byte is the “low” byte of the value I’m sending and the second byte is the “high” byte. In the tiny sample above the low byte is HEX 58 and the high byte is 2. This gives an interval of 2 * 256 + whatever 58 hex is in decimal. This boils down to an interval value of 600 seconds, or 10 minutes.
I wrote the software, tested it, installed it in all four of the sensors we are building and then set them off. I then sent the above command to the sensors to set 10 minute updates and then relaxed in the knowledge of a job well done.
And all my sensors stopped transmitting completely. Wah.
Turns out that I am an idiot. I’d done everything right except the last bit, when I’d sent the following command:
01 02 58
I’d got the MSB and LSB bytes the wrong way round. Rather than having 2*256 I now have HEX 58 times 256. A big number. A six hour or so number. So all my sensors were now not going to transmit for six hours.
Sending the new command wasn’t a problem, but because of the way that we are using LoRa the sensors only look for new commands when they send a reading. So I had to wait for six hours before the command would get picked up and acted on. This is something to bear in mind about LoRa. The remote node is not always listening for a message, it only turns on after it has sent something. This is one way they manage to get such impressive battery life for LoRa connected devices.
I managed to solve the problem by turning the sensors off and on again. They always transmit a packet when they start up so I was able to update the timing with more sensible values without having to wait six hours.
For the last few weeks I’ve had four air quality sensors sitting on the windowsill in the house that faces the nearest LoRa gateway. I’m soak testing the devices prior to putting them on lamp posts around Hull.The air quality in that room must be one of the most highly measured in the county.
Anyhoo, one of the devices decided to try and spoil Fathers Day today by falling off the LoRa network. It was one of those situations where I really hoped that it was properly broken. There’s nothing worse than something that goes wrong every now and then. Unfortunately the darned thing came back to life at the end of the day, and so we are going to replace the CPU. My number one suspect is the antenna connection, but we’ll have to do some tests to prove this.
And no, it didn’t spoil the day. Had a lovely meal out and got some splendid presents.
One of the great things about working with other people is that if you get stuck you can simply hand the problem over to someone else. For ages I’ve been having problems with the serial connection between my Heltec device and the PC failing. I’ve tried all kinds of remedies and even thought one or two might have fixed it, but no. It’s a really frustrating problem because when the connection fails I have to re-boot my PC to make it work again. This rather slows down development.
So, I asked Robin to take a look. He put an oscilloscope on the power supply and looked at what happened when the air quality sensor was turned on. This sensor has a little fan on it and it turns out that this draws quite a bit of current as it begins to rotate. This causes the 5 volt supply to drop to 3 volts for around 50 microseconds, which breaks the USB connection on the Heltec.
Putting a 470uf capacitor across the Heltec power supply fixes this. So we now have fully working serial ports. Yay!
I’m not sure how many of my readers really want to know a good place to get plate to mount air quality sensors on a lamp post, but if you do I can recommend these. They seem pretty strong and two of the fixing holes line up neatly with this box.
If you’re prepared to shop around and wait for delivery from China you can get both these items much more cheaply than the Amazon prices.
Bought three train tickets today. That’s 300 pounds gone…..
Note that this is not our air quality sensor. This is a nuclear warhead. Almost as complicated….
Had a great meeting with John today about the Air Quality sensors that we are going to fit on lampposts around the city. He had a couple of pieces of very sensible advice.
don’t make holes in the top where the water can get in
make a hole in the bottom where water that gets in can drain out
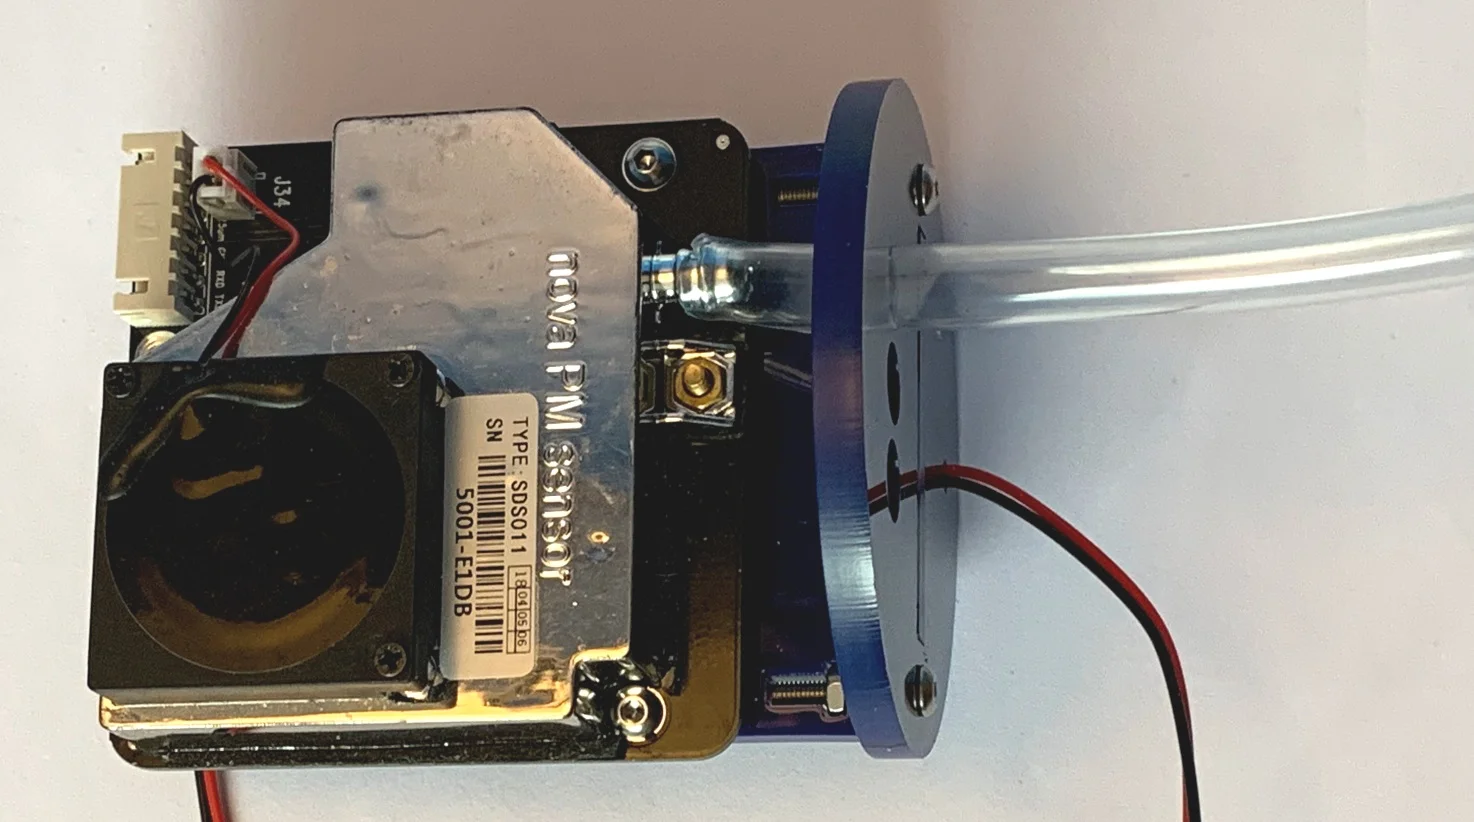
I've been working on an an air quality sensor that we are hoping to attach to a lamp post somewhere in Hull. I’ve got the hardware just about sorted (as you can see above) and the software should work fine.
But it doesn’t.
As soon as I connect everything together the serial interface to the host computer stops working. This is not a problem in operation, but it makes it hard to configure the device. I spent a little while trying to find out how the software could behave in this way and failing. After all, it works fine in other devices that I’ve made. And then I realised a very important aspect of embedded development.
“It’s often a power supply problem. Especially if it can’t be.”
The problem appears when I connect the SDS011 sensor. This is not particularly greedy in power terms, but it does take a bit more out of the device and this seems to tip something over the edge and stop it from working. If I add a second power rail to a different point in the circuit all is well. Now, it might be that the Heltec that I’m using is sensitive in this way, but we can’t have unreliable devices. I think I’m going to have to acquire some PCB design skills and make a proper carrier board with sends the power to all the right places.
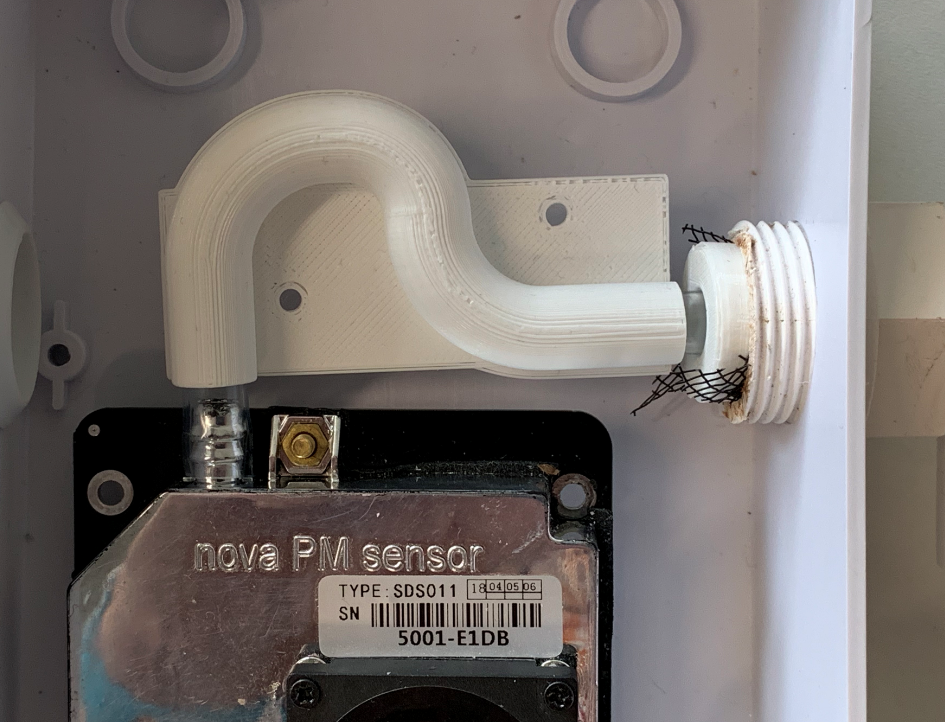
Achievement unlocked. I now know how to make “bendy” things in FreeCAD. It’s actually not that hard once you work out what FreeCAD needs to know. Essentially you use one Sketch to define the path of the template and another (which should be at right angles to the path) to define the closed shape to be created. You can even add another closed shape at the end of the path and then have the shape smoothly change from one to the other. I’ve used this to create tapered tubes.
I’m doing this to make another Air Quality sensor. I want to send the air path round a curve that is too tight for pipe. I also want to add a “u-bend” so that it is harder for water to get into the sensor. I’m quite pleased with the above. Now I just have to figure out how to mount it in the case….
Some of the audience at the start. Note my lovely Surface Go running the whole thing…
Had a great time at the Leeds Sharp meetup tonight. I was there to talk about Air Quality, Azure Functions and Lora. With a guest appearance of my Air Quality top hat. I’m pleased to be able to report that every demo worked. Even the impromptu one that I wasn’t expecting to…If you want a look at the slide deck you can find it here.
One of the lovely things about the night was that the first two folks that I saw at the venue were a couple of Hull alumni, Joshua and Andrew . They were there to make a video of the event. So they did. It’s really good, they’ve caught the presentation content along with some shots of me prowling around looking nervous. I think I’ll hire them for all my events. They’ve put the video on YouTube, you can find it below.
I’m treading the boards again on Thursday evening this week in Leeds. I’m talking about our work with Air Quality sensors and whatnot. With a special guest appearance of the Air Quality Top hat. Should be fun.
If you live in Leeds you can register here. If you don’t live in Leeds you can still travel there and attend if you wish, but I’d probably draw the line at intercontinental flights to get there…..
Please note that, in a break with recent tradition, this session will not be rhyme. (unless they offer me money)
After some fun and games with a drill I now have an air quality sensor mounted in my lamp. Next step is to connect the sensor and the processor board, add the temperature sensor and then stick it on the wall outside my house. Exciting times.
I really like it when I head out of the house with the intention of achieving something and then actually manage to complete the task. Today I headed down to the wonderful Hull Makerspace with the intention of completing my air quality sensor mount design and maybe even cutting it out of perspex.
And that’s exactly what I did.
Fair enough, some of the holes are in the wrong places and some are completely missing. But a little drill work and my first prototype is now ready to be fitted.
The holder has our custom circuit board on one side and the SDS011 sensor on the other.
This is the Red Nose Day presentation in super-duper widescreen and high resolution and also starring a bucket of money. Which has all the best lines. Watch out for the bit where the cameraman falls asleep.
The video shows my Air Quality Hat in action. (still time to donate at https://www.justgiving.com/fundraising/lecture-in-rhyme )
This how I made my Air Quality Top Hat. It’s actually more of an Air Quality belt really, in that the sensors and the lights are attached to a strip of webbing which can then be fitted around the hat. I’ve made it slightly too long, so that it can also be turned into an Air Quality belt if you prefer.
Click on the image for a large version on Flickr
I’m using a Wemos D1 Mini and a Winsen ZPH01 particle sensor. The sensor will detect 2.5 micron particles but it’s not super stable (mind you - it is very cheap). For the light display I’ve added a strip of NeoPixels.
The wiring is just point to point, with some wires twisted together, soldered and then covered with heat shrink cable. The ground line is connected to the grounds on the pixel strip, the Wenos, the ZPH01 ground and the ZPH01 control line to pull that line low and request that the sensor sends serial data out of the TX line. The 5V line from the WEMOS is connected to V+ on the ZPH01 and the V+ of the NeoPixels.
The data line of the NeoPixels is connected to D4 on the WEMOS which is actually GPIO2. I’m using a lovely pixel library from Makuna which uses the onboard UART on the ESP8266 to drive the pixels. This forces them to be connected to GPIO2.
I’m using a specially hand tampered SoftwareSeral driver to get the sensor data, which is read on GPIO12 which is exposed as D6 on the WEMOS device.
The device is powered by a short usb cable that I’ve plugged into the WEMOS and then taped in place. I can use a USB extension lead to program the Wemos and plug it directly into a usb power bank to power the whole thing.
Rather than find a plug and wire up a cable, I’ve actually soldered the wires directly to the back of the sensor. I’m not proud of this, but it does seem to work. The Air Quality sensor and the Wemos are secured to the belt by double sided adhesive foam.
The software I’m using is an early release of my Monitair software for Air Quality sensors. You can find the “Top Hat” version on GitHub here.
If you want to really impress someone just tell them this:
“If you want to use MQTT with PubSubClient and talk to an Azure IoT Hub over secure sockets you should use Version 2.4.2 of the LOLIN Wemos framework or your program will crash when it runs out of memory during socket open.”
Then again, it might just be me that would be impressed by this.
There comes a point in a project where things start to look real. I think we’ve hit that in our Air Quality monitoring project. At the Connected Humber hardware group this evening Brian gave out some populated versions of the sensor circuit board he’s designed and had made. Rather than making all the individual connections by hand we now have a beautiful little board that takes our processor, some power supply and switching circuitry and sensor connections.
It’s very pretty. The next step is to marry it up with our housing designs and start putting sensors into the hands of our waiting test users.
Exciting times.
If I ever join you climbing a mountain, I’ll probably be the one wearing roller skates and carrying a piano.
Sometimes it seems to me that I have a stubborn determination to do things the hard way. For example, today’s task was to create some designs for an outdoor air quality sensor. I wanted a circular fitting to go in the base of a pipe and a support that would attach to the fitting and hold the processor and air quality sensor.
Some people (I think I call these people the “sensible ones”) would reach for their CAD tool and begin designing. Not me though. I reached for my Python interpeter and the ezdxf library that lets you write Autocad files from your code.
I wanted to use the “nut holder” approach to fitting where the laser cut plastic (which is what I want to make the stand out of) holds nuts that a bolt engages with to grip it. I’ve used these on the Hull Pixelbot quite successfully. I was quite proud of the “nut holder generator” that I’d written for the Pixelbot, it even makes each change of direction into a tiny curve, which apparently reduces the chances of the plastic cracking after it has been cut. However, my original code only drew the holders in one direction, whereas for the holder I wanted to put them all around the edges of a circle, as shown above.
Cue lots of bits of paper covered in drawings of triangles, sines and cosines and cursing over code. Eventually I managed it though, and the next step will be to get the plans cut into plastic so that we can make some sensors.
I’ve got the web based configuration for the Monitair working quite well now, but it is a bit of a faff to use. You have to connect to the WiFi access point served by the Monitair device and then navigate to the web page it is hosting.
If you have got the device connected to your PC, perhaps to download the software, it would be nice if you could configure the settings via the serial interface. Well, you can now. I’m using the same data source as is used to generate the web page, and I’ve added some useful commands as well. Now you can set any of the values in a device straight after programming it, which is rather nice.
Rob Miles is technology author and educator who spent many years as a lecturer in Computer Science at the University of Hull. He is also a Microsoft Developer Technologies MVP. He is into technology, teaching and photography. He is the author of the World Famous C# Yellow Book and almost as handsome as he thinks he is.
Begin to Code with JavaScript is now available for purchase and download. You can find it here