Raspberry Pi Model 4 a bit slow at 4K

So I’ve got my Raspberry Pi model four running and I thought I’d try it driving a 4K monitor. Promotions of the device have made much of the fact that this new version has not one, but two video outputs and they can run 4K video.

I don’t want two 4K displays, but a single one that works correctly would be nice. Unfortunately the performance is not great. It might be me, but it seems that although the desktop looks splendid it does seem to lag a bit. Moving the mouse around turns into a game of skill, where you have to stop moving the mouse before it arrives at the desired destination. This might be a great idea for a video game, but it isn’t much fun when you are trying to use the device.

I’m hoping that this is caused by early versions of the operating system not being optimised for the new hardware, but if you’re thinking of getting a model 4 I’d advise you to get your hands on a device and have a play before you splash any cash.

Raspberry Pi Model 4

I remember when the Raspberry Pi was first announced. A credit card sized proper computer which cost 25 quid? A likely story.

Twenty five million sales later, the story is looking more likely than ever. And now we have version 4.0. This version is interesting for a whole bunch of reasons. They reckon it has around twice the speed of the previous version, and you can now get it in memory sizes that go from 1 to 4 Gbytes. It now supports two monitors and 4K video output (although its a bit tricky if you try to use both at the same time). It also has two USB 3.0 sockets and the specs speak of much faster data transfer. The mounting holes look to be in the same place, and the pin-out for the “hat” connector is the same, although the pins can be re-purposed to get some extra I2C and serial ports which is very welcome.

The bad news is that there are a few “breaking” changes from the previous device. The video sockets are now micro-HDMI and there are two of them, which means that case designs will have to change and you’ll need to change your video cables. The power is now supplied via a USB-C socket and you need a bit more of it. The days of hanging a Raspberry Pi off a USB socket on a PC may be over. And if you want to get full speed all the time (or play with overclocking) you’ll need to add cooling to prevent the processor slowing down when it gets too warm.

But this does mean that you can consider using the Pi as a desktop replacement. I know they say that with every new release of the platform, but this time it might actually be true. The extra ram will make it possible to multi-task with ease, and the faster USB sockets mean you can connect fast hard drives too. However, having said that, I reckon that the extra power is interesting because it makes it easy to use a Pi as a proper “edge computing” device. It should be very possible to run some proper AI on this platform, allowing you to put a lot of computing power right next to your sensors, which makes things very interesting.

I can’t find any word from Microsoft as to whether the IoT version of Windows 10 will be ported to the Raspberry Pi 4. I really hope that it will be. Windows 10 on this platform would be awesome.

I’ve ordered myself a device, I’m looking forward to it coming and having a play.

Spotting a smile with Windows IoT

I’ve been working on my demos for the Insider Dev tour. One of the examples shows how to use Azure Cognitive Services to analyse a picture, find faces and see how happy they are. I’d like to use this in my demo, but I want to use the camera rather than a fixed image.

Anyhoo, I’ve got it working. The Raspberry Pi snaps a picture, sends it to the cloud and then gets back the location and happiness of anyone in it. I’m looking forward to showing it off next week.

I don’t intend to point the camera at the audience though……

Hull Raspberry Pi Jam with robots

Well, that was great fun. Spent the morning at the Hull Raspberry Pi Jam. It was something of a "RobotFest". I had my Hull Pixelbots and Coretec Robotics were there with their balloon Raspberry Pi powered balloon busting robots. I was trialling a new idea I've had, called the "Robot Rumble". The idea is that players code up their robot warriors to get as far into their opponents area as possible. You can find the draft rules here

As it turned out we didn't get that many rumbles going, but folks had great fun making their robots do things, including some things I'd never have thought of, which was rather nice. And from the sounds of bursting balloons and cries of victory coming from the other side of the library, fun was being had there too. 

The second part of this post was going to have the title "Three Thing Game Judging Fun". But instead I'd have to use the title "I probably shouldn't have eaten that chicken from the fridge". Number one wife did ask me to check the sell by date but I was confident it was fine. And besides, I'd thrown the package away.

By 2:30 it was turning out that the chicken might not have been that fine after all. And an attempt to "kill or cure" by drinking a can full of "Old English Ginger Beer" didn't have the desired effect. Which meant I had to beat a hasty retreat from the event and head home for a lie down amongst other things. 

Fortunately the effects don't seem to have been too long lasting, which is a good thing as I'm supposed to be driving to Birmingham tomorrow. 


Raspberry Pi at c4di Hardware Meetup this Thursday

If you were at the "Easy as Pi" HullDevs presentation from John Tasker last week (incidentally he has put his slides and sample code here) you might like to come along to our Hardware Meetup onThursday this week at the c4di, starting at 6:00. 

If you have any questions, or have a Pi that you want to get started with, or want to see what you can do with your Pi, then come along. Hardware welcome. I'll be bringing some of my Pi collection, including the world famous Logo Blaster. You can sign up here.

The Pimoroni Mood Light Rocks

I just love a busy desk. 

A while back I ordered a Mood Light kit from Pimoroni. It never came (sad face). I told them about this and they dispatched a replacement. The same day. With no quibble or question (happy face). It arrived a couple of days ago and today I found enough time to assemble it.

With it being based on the Raspberry Pi I had to find a video display and a keyboard for it to get things going. I ended up using my video projector of Logo Blaster fame and a little remote keyboard that didn't work until I connected it via a usb hub.

The good news is that the Raspberry Pi experience has come on a lot since my early days with my Pi B. The great news is that the kit itself is awesome. Lovely attention to detail, even down to little rubber feet for the stand. It all fits together in a very impressive way and worked first time. If you're thinking of building one, you'll need to solder the connectors onto the Pi and the display device. If you've not soldered before it might not be the best thing to learn on, but if you've soldered a bit you'll have no problems. You'll need a power supply and a micro-SD card but nothing else, the kit has everything and comes beautifully packed in a nice plastic box. 

Once I'd got the Pi going and set up remote access I was able to do everything via my PC, so I could put my keyboard and monitor away. You control the lights (there are 32 neopixel leds on the lamp) from Python, so there is no limit to what you can make the light do. 

I'm very impressed with the kit and the Raspberry Pi Zero that it is based on. The fact that you can get the thing for thirty quid (or even less if they are having a discount offer running) makes this thing astonishing value. You should get one. So much power and potential for less than a full price video game. I'm going to get the Scroll Bot next.

Hull Raspberry Pi Jam

Today I was in Hull doing a bit of shopping. As you do. I also dropped into Hull Central Library to give Matt a pixel for his Hull Pixelbot. He's written a lovely blog post about building a robot last Thursday, and I thought I'd give him something extra to work with.  Matt was helping at a Hull Rasp Jam event.

Libraries have changed a bit since we used to take the kids every week to swap their books for different ones. There are still books there, but you can also find crafting sessions, people playing chess and  Raspberry Pi events too. Great stuff. 

I wasn't able to stay long at the jam, but it was great to see lots of people engaging with technology and having fun doing it. I'll try and make a bit more time for the next one. 

Using a Raspberry Pi as an Access Point with Windows 10

I've got a few things running for my TechDays sessions next week. They are working fine on my home network. Now, I know that the conference will have WiFi, but in my experience this can be problematic. Sometimes they use browser based authentication steps which are hard to replicate on a device with no screen, keyboard or mouse. 

But I have a plan. I've got a portable access point that I use on occasions just like this. I know exactly which shelf it is stored on, in a nice little case and everything. So I go and grab it. Of course it's not there. It's not anywhere. Blarst.  

However, I do have a Raspberry Pi 3 which I was planning to take along as well. And it turns out that it will work as an access point too. And setting it up is a dead doddle. I started with the howto here. That got me the Windows 10 IoT Core Dashboard which is an awesome little program that will create an SD card to use to boot your Pi and then take you through connecting and configuring it. The great thing for me is that it lets you use a "naked" Pi, with no keyboard, mouse or screen. All the configuration can be done via the browser based control center. 

If you want to turn your Pi into an access point just head for the IoT Onboarding page you can see above, select a suitably obscure SSID and password and then save them. (I'd advise against the defaults). After a reboot you should have an access point which clients can connect to. 

If you want to share the wired network connection from your Pi you have to actually turn this on. The user interface here is a bit rubbish to be honest. There's nothing I could see that indicates if the sharing is on or off, and you have to make sure that you connect the right adaptors at each end. Which is why you might find the screenshot useful. Just select the items that you can see in the "Access point adaptor" and "Shared network adaptor" and then click the "start shared access" button. And then it all just works. Awesome. 

One tiny gotcha. On my Pi the SSID gets a bunch of hex characters added to it.  HullSSID would probably change to XY_HullSSID_ED50. Browse for the WiFi connection with another device before you put the text into a client program.

Raspberry Pi 3 - Most Interesting

The first Raspberry Pi was a nice device. At the time it was ground breaking. The Raspberry Pi 3 looks at least as ground breaking. It's faster, of course, but it also has WiFi and Bluetooth built into it, which makes it a ready to roll, fully connected Internet of Things device. Previously you'd have to use a physical  network cable and then directly connect your Pi to the device you wanted to talk to. Now you can do it all without wires.  

You can get the Windows 10 Insider Preview that works on the Pi 3 from here

I've ordered mine. 

Windows 10 on Raspberry Pi Rather Useful Seminar

We had a Rather Useful Seminar today. I talked about Windows 10 on Raspberry Pi 2. Great fun and all the demos worked. It is rather impressive to be able to flip a switch and swap from PC to Pi deployment, and still have all the Visual Studio loveliness including  breakpoints and full debugging support.You can find the slides here.


WiFi on Windows 10 Raspberry Pi

I've been playing with Windows 10 on Raspberry Pi for a while. It works really well. It is now my weapon of choice for proper embedded applications.

The Arduino is lovely for tiny apps, but if you find yourself adding SD card interfaces and network adapters and displays you might as well move up to the Pi and get the benefit of C#, Visual Studio and a properating system like Windows 10. 

Up until now I've been tied to a network cable as the previous versions of the Windows 10 Raspberry Pi platform didn't support WiFi. But the latest one does. You have to use the "official" Raspberry Pi WiFi interface, but as this is one of the cheapest (at six pounds) I don't see this as a problem. 

I've added one to my Pi and it works fine. The only problem I've found is that at the moment it doesn't support WiFi connections using the "organisation" authentication that we have at work on the campus network. However, it works fine at home my my domestic network. If you are writing Windows 10 applications for Raspberry Pi you should get one of these for each of your systems. They also raise the lovely prospect of properly powerful connected applications. 

Reading Raspberry Pi inputs using C# in Windows 10

The LogoBlaster and its buttons

The LogoBlaster and its buttons

I had a lot of fun making my Windows 10 LogoBlaster. At the heart of the program is code that responds to the buttons that are pressed to select the required command. These are wired to inputs on the Raspberry Pi. It turns out that some of the inputs have pull up or pull down resistors, which helps keep the wiring simple.

I used the pins that have Pull Down resistors on them. These resistors do what the name implies. They pull the voltage on the input pin down to the ground level. The diagram above shows how this works. The Pull Down resistor connects the input port to the ground level, which means that if the switch is open the signal at the port is 0. But when the switch is closed it pulls the input port up to the power supply voltage, causing the signal at the input port to rise to 1.

If you don't have the pull down resistor (i.e. you let the input port pin wave about in the air with nothing connected to it until the button is pressed) you run the risk of induced voltages leading to spurious input signals. Sometimes you have to actually add your own resistors to the circuit, but in the case of the Raspberry Pi they are built into the hardware so all I had to do was connect the input port in to the switch. There is a table here which tells which pins have pull ups and which have pull downs.

        const int B1Pin = 12;  // wired to pin 32
        const int B2Pin = 13;  // wired to pin 33
        const int B3Pin = 16;  // wired to pin 36
        const int B4Pin = 26;  // wired to pin 37

These are GPIO pin numbers I used for each of my buttons.  Note that the GPIO numbers used by the software don't correspond to the pin numbers on the header on the Raspberry Pi, but I've put these in as comments.

var gpio = GpioController.GetDefault();
GpioPin nextColorPin = gpio.OpenPin(B1Pin);
nextColorPin.DebounceTimeout = new TimeSpan(0, 0, 0, 0, 20);
nextColorPin.ValueChanged += nextColorPin_ValueChanged;

...

private void nextColorPin_ValueChanged(GpioPin sender,
                    GpioPinValueChangedEventArgs args)
{
    if (nextColorPin.Read() == GpioPinValue.High)
    {
        command = DisplayCommands.NextColour;
    }
}

This is the code that sets up and uses the pin. Note that I set a debounce timeout of 20 milliseconds. This is there because the switches that I used were a electrically noisy and sent quite a few extra ones and offs when they were pressed.

The handler for the pin works very like a normal XAML button, in that it generates events when the input pin changes state. The  code in the event handler checks to see if the pin has changed to the high state (which means that the button has been pressed) and if it has it sets a command value to change the display colour. The code is repeated for the other buttons which select the different commands

Windows 10 Celebration fun and frolics

Well, that was nice. Turns out that Microsoft can build operating systems and also organise great parties. We got there a couple of hours before the doors opened and got everything working just in time for the start. I was responsible for the "Lift Off" game and the LogoBlaster. The Lift Off game has one or two gameplay issues, but I was surprised (and pleased) to find that some folks worked out how the game worked and then got very competitive.....

The LogoBlaster worked incredibly well. This is my pairing of a Raspberry Pi running Windows 10 and a portable video projector. We ere using it to project Windows 10 logos on passers by. 

It was interesting to notice that some folks didn't really get what it was doing until I showed them where the pictures were coming from. We managed to get the Raspberry Pi to load the LogoBlaster program on boot up, so that the unit became completely wire free. I was able to happily wander round adding logos to passing people.

Demonstrating the power of Logo Blaster

Demonstrating the power of Logo Blaster

Adding cheese to the surroundings

Adding cheese to the surroundings

Shameless self promotion - and a hexapod robot

Shameless self promotion - and a hexapod robot

The best moment came when we pointed the LogoBlaster  at someone's head by mistake. And the results were awesome. He (I'm awfully sorry sir - I've forgotten your name) was even happy to pose for a while as we took some more pictures.

This came out really well. I've put a whole bunch more pictures on Flickr. You can find them here.

The event ran for four hours. By the end we were all thoroughly hoarse from talking to folks about what we had done. But it was wonderful. We packed up in double quick time and staggered back to the hotel. Thanks to Paul for inviting me and letting me be part of this event. Great fun. 

Game Mechanics and Raspberry Pi's running Windows 10

I had a go at writing a game for Three Thing Game last week. Just to be different I thought I'd do a hardware game using Windows 10 on the Raspberry Pi. We had some fun and games getting the Raspberry Pi to work in the labs, mainly because the lab network didn't give them a network address when the Pi asked. That and the fact that for some reason Logitech USB mice just don't work on a Raspberry Pi running Windows 10. No idea why. They just don't.

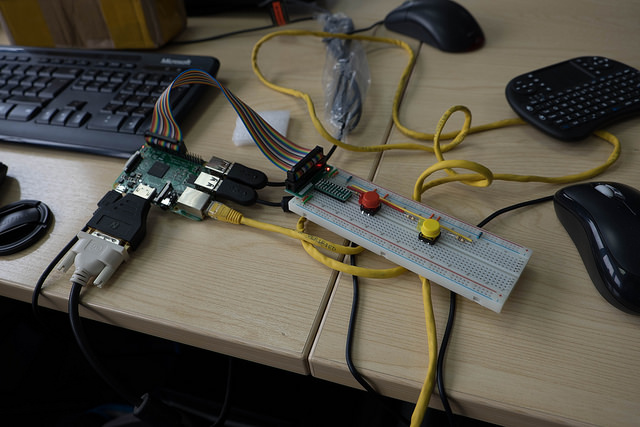
Anyhoo, we got everything working and I started building the game. I connected two leds and two switches to the Pi and got them working. Then I built the game mechanic. This is the way that the game is supposed to work. My first idea was that the player would have to press the button when the light came on, but I decided that this was a bad idea because after a while the switch will get destroyed by people bashing it in a hurry.

So I switched it around. When the light goes off you need to release the button as fast as you can. I called the game "Lift Off" because that's what you are supposed to do, and I made it competitive. The idea was that two players would compete in a number of rounds over a 30 second period. They'd press the button, the light would come on for a random time and then go off. The game would then time how long it took the player to release their button and then add that time to the player's score. At the end of the time period the player with the lowest score wins.

I got the code working and it was OK. But then I came across serious flaw in the gameplay.

You could win by not pressing the button at all.

If you never press the button, the light never comes on or goes off, and you end up with an unbeatable score of zero points. So I'd invented a game where doing nothing was the absolute best winning strategy. Oh well.

I've now added a timer so that if you don't press the button you get a big penalty, and I'm tuning the gameplay at the moment. I'll blog how the code works a bit later, once I've got the gameplay mechanic properly sorted - something I should have thought about earlier. Another lesson learned.

The experience of writing a C# XAML application for Raspberry Pi was a bit strange, but in a wonderful way. Everything was exactly where I expected it to be, but I was targeting a tiny device. I had access to all usual development tools. I could step through code and view variables in Visual Studio, use all the libraries that I know and love, but I was targeting a device that costs around 25 quid. If you're running Windows 10 and you've got the Visual Studio 2015 preview running you should have a go at this. It is going to make it much, much, easier to create rich applications for cheap embedded controllers. Very nice.

C4DI Hardware Meetup - You Should Come Along - Really

If you live in the Hull area and have any kind of interest in technology there's a very good chance you'd enjoy a C4DI hardware meetup. They are first Thursday of every month and we have a mix of folks who like playing with computers and hardware and stuff. This month we had a Raspberry Pis of various flavours (which sounds wrong but it's right), flashing lights, amazing embedded devices you can get for less than a fiver and some brilliant discussions amongst other things.

Keep an eye on the Hull Meetup site for the next one.

Benchmarking the Raspberry Pi 2 in Python

Well, I went off the the Post Office and got my Raspberry Pi 2. I really wanted to find out what kind of improvements you see when you use it.

The answer is, a lot. 

Booting was snappy, and the time to launch X-Windows was quite a bit quicker (although I'm not sure of the effect of the different SD cards I was using). But things got quite conclusive when I ran a little Python profiler:

  • Original Raspberry Pi B:  207 function calls in 0.017 seconds
  • Raspbery Pi B 2: 207 function calls in 0.003 seconds

This is just one test, but it shows a lot of promise. Python really seems to benefit from the extra cores as well as the faster processor.

Just pootling around the internet with the browser is a lot quicker than the original Raspberry Pi, but doesn't really compare with my super cheap Linx tablet, which is on paper a broadly comparable device. I'm not yet convinced that someone looking at the Pi 2 as a desktop replacement will find it a good plan, but as a step up from the original it is fantastic.

Raspberry Pi 2 and Windows 10

News of the Raspberry Pi 2 took me completely by surprise. And then, to add to this shock I find that it is not only an awesome device, but available to buy right away. Amazing. Who do these people think they are? Apple?

If the news of a new Pi with quad core processor and twice as much RAM wasn't enough though, I then find that the new Pi will be able to run Windows 10. For free. The only word I can think of to sum up this turn of events is blimey. 

The Windows 10 support will be limited to "universal" applications, which means an end to  any dreams of running Visual Studio on a device you paid 25 quid for. But that does mean that you can use Visual Studio to write and deploy programs onto the device, which will be great. You can find out more about Windows 10 on Pi here.

The development puts a mild question mark over devices such as Galileo and Edison, which are of the same ilk, but are more expensive and have no display capability. I guess everything will settle down and find its place eventually. The two Intel devices probably have a bit more straight line speed, although the 900 MHz four core processor in the new PI is not to be sneezed at. 

Anyhoo, my Raspberry Pi 2 is presently sitting in Cottingham Post Office waiting for me to drop round and pick it up. I actually bought 2. One to give the Video Arcade Table a shot in the arm, and the other for playing with.  We really do live in interesting times. 

Update: I've had a chance to do a very quick benchmark and compare the performance of the original and the new Rapberry Pi. You can find out more here