Why is Windows 10 so slow at sorting file folders?
/
I actually managed to write and post this while Windows 10 was sorting my downloads folder into date order. And I'm not a very fast typist.
Anyone else seen this? Anyone know why this is?
I actually managed to write and post this while Windows 10 was sorting my downloads folder into date order. And I'm not a very fast typist.
Anyone else seen this? Anyone know why this is?
I'm bringing some old machines back into commission in case I need some spare devices for our "Build a robot in a day" course on Friday. Of course I'm updating them to the latest version of Windows 10, Fall Update Creators edition. My experience has been that, unlike previous versions of Windows on low powered machines, successive versions of Windows 10 have better performance than the previous ones on resource constrained devices.
Anyhoo, the update on my lovely Packard Bell Butterfly tablet went OK. But afterwards the WiFi didn't work. So, not OK then.
The good news is that I've seen this problem before. And fixed it. This time I'm blogging about it so that I'll remember for the next machine I find that has this problem
Close the properties dialog and reboot the machine. You should find that WiFi now works. Or at least, I did.
Some things you just have to learn the hard way. For a while I've been frustrated by the way that my Arduino projects would build fine for a while, and then fail after I had saved them.
Eventually I worked out that if you're working on a folder which is being shared by One Drive (or DropBox and probably Google Drive) this causes the Adruino SDK to get upset when it tries to build a solution. This must be due to the file sync process causing files to be locked when they shouldn't be. Move the files to your desktop and the program builds perfectly.
Of course, the proper way to share a development project between a bunch of machines is to use GitHub, and that's what I'll be doing in the future....
I'm rather liking the Windows 10 Creator's Edition Fall Update Feature Release 1709 for x64 based Systems (KB4041994).
It's full of little changes that just make everything that bit better. Like the way that the Onedrive sync status is now showed in a separate column, rather than on top of the file icon so that I couldn't tell what type of document I was looking at.
On tip though, after the upgrade I was a bit worried that my system disk had suddenly got a lot smaller. I managed to free off 41 GBytes just by deleting previous Windows installations.
I've installed Windows 10 Creator's Edition Fall Update. It's very nice. It has a lot of extra support for 3D printers. And I got all excited when I found out that there's an application for the Windows 10 IoT Core running on Raspberry Pi that lets you install your printer on the network and then print to it straight from Windows 10.
It doesn't work. At least, not for me. I've spent all afternoon creating SD card images, configuring them and then finding out that I always get assigned the same (wrong) printer device and then the driver fails to load.
Oh well.
I've got lots of things I've designed using the lovely FreeCAD program. I wanted to play with them in Paint 3D in Windows 10 Creators Edition. If you want to do this too, this is how:
FreeCad doesn't seem to support a format that Paint 3D understands. You'll need to use a converter program to do this. I've found a free program at NCH Software that seems to do the trick. First thing you need to do is download and install the program.
Then, in FreeCad, select all the elements of the model that you want to export in the editor. Then select File>Export from the FreeCad menu to display the Export Dialog:
Select the "Wavefront OBJ" file type as you can see above. Give the file a sensible name, and then click Save.
Now you need to convert the OBJ file into a 3MF file. Open up Spin 3D. Select Add File (the big plus) and add your file. You can add lots of files if you like.
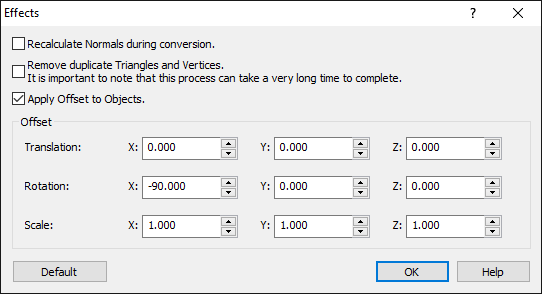
I've found that models need to be rotated for some reason (perhaps because the coordinate frames of reference are different). Click the Effects button in the bottom left to ask the Spin program to do this for you.
You want to rotate -90 degrees about the X axis. Click the "Apply Offsets to Objects" checkbox and then put -90 in the Rotation X box, as shown above. Then click OK to close the Effects dialog.
Make sure that you've got the output format set to 3md as you can see above, and then click the Convert button on the bottom right hand side of the Spin 3D window. Your design will now be converted into a 3mf file that you can import into Paint 3D.
I even managed to put the design into the Remix 3D site for people to download and play with. You can find it here.
So yesterday I did a clean install of Windows 10 from a memory key. It was for my HP Sprout, which had got itself into a big of a pickle after I upgraded the hard drive.
I booted from the memory key and up came the setup program. It had a slight whinge about all the partitions on the disk and so I thought I'd get rid of everything. If you press Shift+F10 at the disk management menu in the Windows 10 installer you get yourself a command prompt. Which you can use to load the Windows Disk Partition Tool, diskpart. So I did.
The Windows disk partition tool is strong magic. Like, make your system not work any more and all your files vanish magic. It lets you specify the fundamental arrangement of the storage areas on your hard disk. The Sprout had all these recovery partitions and weird bits and pieces lying around which I really didn't want. (and of course I'd made a backup). So I used the "clean" command.
I've not used it before, previously I've removed and merged partitions by hand. But clean makes it much easier. Scarily so. I was expecting some form of confirmation dialog when I issued the command but no, it just went ahead and cleared the drive. Windows 10 then had a shiny empty disk to go to town on, and it did.
The Windows 10 installation process is now very slick. It's fast too. I had a working operating system around 10 minutes after cleaning the disk. And it rounds off the installation with a chat from Cortana to set the final options for your machine.
I like the Creators Edition very much. The only downside I've found so far is the fact that the old style command prompt has been replaced with the new fangled PowerShell. The command prompt harks all the way back to MS-DOS, and I really like that. PowerShell is way, way, better, in many ways, but I must admit that for me the command prompt is nicer. However, if you get the PowerShell prompt you just have to type CMD and press return, and your command prompt is back in all it's glory....
Windows 10 is lovely. But there are some things that it does that drive me a bit nuts. Like, when I've downloaded a file, and then want to find it in my downloads folder.
Not a particularly strange request you might think.
But Windows 10 acts as if I've just asked for the cure for cancer and the ten millionth digit of pi. Along with next week's lottery numbers. My powerful machine with it's ultra-fast hard disk (at least that's what the salesman said) grinds to a halt while the operating system "works on" finding the files in a folder.
Why?
You know how it is. You have built a robot army that you're going to use to take over the world, but first you have to get them all under your control. And if you are using tcp/ip (the world domination network of choice) then you have to give them all an ip address and then put those addresses into your world domination program.
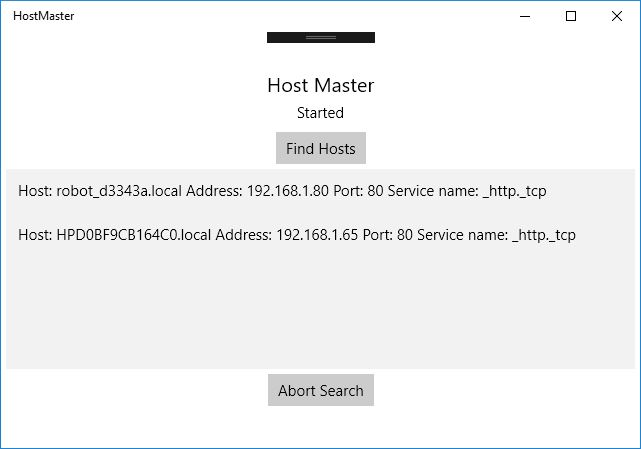
mDNS makes this much easier. It's how Apple's Bonjour network discovery works. A device running mDNS is discoverable on a local network. You can find all the hosts and their ip addresses, along with the services they are providing and the ports. Windows 10 provides a Watcher service that you can use to discover all the machines on a local network, but it is a bit of a pain to use.
So I've written a tiny mDNSManager class that you can use to create and manage a watcher object which will start a search for devices, tell you when it finds one and also present a list of all the devices it has found so far. It's very easy to use.
You can find the source code for both the manager and a simple demonstration application on GitHub here.
If you want to just use the manager in your programs you can install it from NuGet:
Install-Package RobMiles.mDNSManager
It works on any Windows 10 device, including the Raspberry Pi, and it makes it much easier to connect to a large number of devices. There are mDNS samples available in the example applications for the ESP8266 devices in the Arduino IDE.
I'm using this to allow me to create a Universal Application that will control a bunch of HullPixelbot devices without needing to know their ip addresses in advance.
I've got a few things running for my TechDays sessions next week. They are working fine on my home network. Now, I know that the conference will have WiFi, but in my experience this can be problematic. Sometimes they use browser based authentication steps which are hard to replicate on a device with no screen, keyboard or mouse.
But I have a plan. I've got a portable access point that I use on occasions just like this. I know exactly which shelf it is stored on, in a nice little case and everything. So I go and grab it. Of course it's not there. It's not anywhere. Blarst.
However, I do have a Raspberry Pi 3 which I was planning to take along as well. And it turns out that it will work as an access point too. And setting it up is a dead doddle. I started with the howto here. That got me the Windows 10 IoT Core Dashboard which is an awesome little program that will create an SD card to use to boot your Pi and then take you through connecting and configuring it. The great thing for me is that it lets you use a "naked" Pi, with no keyboard, mouse or screen. All the configuration can be done via the browser based control center.
If you want to turn your Pi into an access point just head for the IoT Onboarding page you can see above, select a suitably obscure SSID and password and then save them. (I'd advise against the defaults). After a reboot you should have an access point which clients can connect to.
If you want to share the wired network connection from your Pi you have to actually turn this on. The user interface here is a bit rubbish to be honest. There's nothing I could see that indicates if the sharing is on or off, and you have to make sure that you connect the right adaptors at each end. Which is why you might find the screenshot useful. Just select the items that you can see in the "Access point adaptor" and "Shared network adaptor" and then click the "start shared access" button. And then it all just works. Awesome.
One tiny gotcha. On my Pi the SSID gets a bunch of hex characters added to it. HullSSID would probably change to XY_HullSSID_ED50. Browse for the WiFi connection with another device before you put the text into a client program.
So the Windows 10 upgrade on my Sony Ultrabook worked fine. Rather too well. Some time back I had to disable the touch screen on this device because the hardware has failed somewhere and detects two finger presses all the time. Which made controlling the machine rather tricky.
Anyhoo, of course the Windows 10 upgrade turned the touch screen back on. Thanks for that.
However, I've discovered that if I press down lots of points on the screen it kind of overloads and stops recognising things, so I can use the keyboard and mouse. But it did make some interesting gymnastics as I kept as many fingers as I could on the screen while opening Device Manager and disabling the touch screen driver.
It works fine now. Kudos to Microsoft for a very smooth upgrade on both the ultrabook and my twisty tablet.
The Windows 10 free upgrade stops being free on Friday 29th July. Which means that, what with my flair for forward planning, I've been digging out old machines and upgrading them this week because it would be daft not to. One of the machines that I found was my Packard Bell twisty tablet of a few years ago; Still works fine, but I'd forgotten the password to log in. The machine was keyed to my Microsoft account and I've changed my password several times since I last used it. And I can't for the life of me remember the old ones.
Idiot me (although actually a knack for forgetting old passwords is a useful thing to acquire as it stops you using the old one by mistake). Anyhoo, I found a YouTube video that showed a nifty way to break back into a Windows 8 system. The video was a good start, but I had a few issues. For a start, when you run the command prompt via your USB booted copy of Windows 8 the system drive you have to tamper with might not be drive C: (in my case it was drive e:).
Another problem is that the hack doesn't seem to let you fix the passwords of accounts linked to Microsoft. But you can create new local accounts, including ones with administrator privileges, which gets you going. The wise amongst you are probably saying "Why didn't you just attach the machine to a network and let the passwords catch up?". Well, two answers. Firstly I think the mechanism has changed since my machine last ran. And secondly the clock was placing the machine somewhere in 2013, which meant that all the secure sockets stuff was broken. And of course to put the clock right I had to log in.....
The machine is presently at 92% of the upgrade process. If you've got machines that you want to keep useful I'd advise having a quick check around the house to see if you can get them going and update them. I'm probably going to pass my machines on once upgraded, but they'll be a lot more useful if they are running Windows 10.
The first Raspberry Pi was a nice device. At the time it was ground breaking. The Raspberry Pi 3 looks at least as ground breaking. It's faster, of course, but it also has WiFi and Bluetooth built into it, which makes it a ready to roll, fully connected Internet of Things device. Previously you'd have to use a physical network cable and then directly connect your Pi to the device you wanted to talk to. Now you can do it all without wires.
You can get the Windows 10 Insider Preview that works on the Pi 3 from here.
I've ordered mine.
I've been playing with nuget.
It's awesome.
It is fantastically easy to package up an assembly and make it available for just anyone to use in their applications. It is beautifully integrated into Visual Studio and I reckon it is actually easier to download a package from the other side of the world and make it part of your solution than it is to add one that you have written yourself on your own machine.
To practice I've packaged up my Bluetooth Manager library. This is a little wrapper class that makes it really easy to use Bluetooth on Windows 10 applications. I've not tried it on Windows 10 on Raspberry Pi (but I've tried it on lots of other systems and it works fine). You can find out a bit more about it here. I use it so that I can print message on my little home made Bluetooth printer, but you can use it anywhere you want to talk over a Bluetooth serial connection.
Oh, and in case you are wondering why it is version 1.0.1 and not version 1.0.0 I found an interesting quirk in nuget. If your library class doesn't have a public constructor the package will fail to work because Visual Studio will complain that the class is "Inaccessible due to its protection level.". That's what happens when you try to use version 1.0.0
We had a Rather Useful Seminar today. I talked about Windows 10 on Raspberry Pi 2. Great fun and all the demos worked. It is rather impressive to be able to flip a switch and swap from PC to Pi deployment, and still have all the Visual Studio loveliness including breakpoints and full debugging support.You can find the slides here.
I really like my Surface Pro 4 keyboard. Especially the fingerprint sensor bit, which makes unlocking my device very easy. Unfortunately the fingerprint sensor enabled version of the keyboard is not available in the UK. Fortunately I'm presently in the 'states and I've been able to get hold of one from the Microsoft Store here.
The bad news is that it is, of course, a keyboard with the US layout. The good news is that it is extremely easy to change keyboard layouts in Windows 10. The first thing you need to do is make sure that your machine has both languages installed. Go to Settings> Time and Language
If you're missing the USA language option just press the + and add English(United States). Then, whenever you call up the keyboard you can select the language to use by calling up the on-screen keyboard and pressing the key in the bottom right. Then, pick your language. The change takes effect immediately and it means that I can swap between my docked keyboard (UK) and my Pro 4 keyboard (US).
The only snag is that of course some of the keys are in different places, but I'm getting better at adapting....
If you fancy getting to grips with Windows 10 Development (and you should) there's a new set of videos and samples that you will find very interesting. One of them shows how you can write programs that connect to the Marvel Comics database, which is awesome.
Find out more here.
I've been playing with Windows 10 on Raspberry Pi for a while. It works really well. It is now my weapon of choice for proper embedded applications.
The Arduino is lovely for tiny apps, but if you find yourself adding SD card interfaces and network adapters and displays you might as well move up to the Pi and get the benefit of C#, Visual Studio and a properating system like Windows 10.
Up until now I've been tied to a network cable as the previous versions of the Windows 10 Raspberry Pi platform didn't support WiFi. But the latest one does. You have to use the "official" Raspberry Pi WiFi interface, but as this is one of the cheapest (at six pounds) I don't see this as a problem.
I've added one to my Pi and it works fine. The only problem I've found is that at the moment it doesn't support WiFi connections using the "organisation" authentication that we have at work on the campus network. However, it works fine at home my my domestic network. If you are writing Windows 10 applications for Raspberry Pi you should get one of these for each of your systems. They also raise the lovely prospect of properly powerful connected applications.
The LogoBlaster and its buttons
I had a lot of fun making my Windows 10 LogoBlaster. At the heart of the program is code that responds to the buttons that are pressed to select the required command. These are wired to inputs on the Raspberry Pi. It turns out that some of the inputs have pull up or pull down resistors, which helps keep the wiring simple.
I used the pins that have Pull Down resistors on them. These resistors do what the name implies. They pull the voltage on the input pin down to the ground level. The diagram above shows how this works. The Pull Down resistor connects the input port to the ground level, which means that if the switch is open the signal at the port is 0. But when the switch is closed it pulls the input port up to the power supply voltage, causing the signal at the input port to rise to 1.
If you don't have the pull down resistor (i.e. you let the input port pin wave about in the air with nothing connected to it until the button is pressed) you run the risk of induced voltages leading to spurious input signals. Sometimes you have to actually add your own resistors to the circuit, but in the case of the Raspberry Pi they are built into the hardware so all I had to do was connect the input port in to the switch. There is a table here which tells which pins have pull ups and which have pull downs.
        const int B1Pin = 12;  // wired to pin 32
        const int B2Pin = 13;  // wired to pin 33
        const int B3Pin = 16;  // wired to pin 36
        const int B4Pin = 26;  // wired to pin 37
These are GPIO pin numbers I used for each of my buttons. Note that the GPIO numbers used by the software don't correspond to the pin numbers on the header on the Raspberry Pi, but I've put these in as comments.
var gpio = GpioController.GetDefault();
GpioPin nextColorPin = gpio.OpenPin(B1Pin);
nextColorPin.DebounceTimeout = new TimeSpan(0, 0, 0, 0, 20);
nextColorPin.ValueChanged += nextColorPin_ValueChanged;

...

private void nextColorPin_ValueChanged(GpioPin sender,
                    GpioPinValueChangedEventArgs args)
{
    if (nextColorPin.Read() == GpioPinValue.High)
    {
        command = DisplayCommands.NextColour;
    }
}
This is the code that sets up and uses the pin. Note that I set a debounce timeout of 20 milliseconds. This is there because the switches that I used were a electrically noisy and sent quite a few extra ones and offs when they were pressed.
The handler for the pin works very like a normal XAML button, in that it generates events when the input pin changes state. The code in the event handler checks to see if the pin has changed to the high state (which means that the button has been pressed) and if it has it sets a command value to change the display colour. The code is repeated for the other buttons which select the different commands
I've been running the preview releases of Windows 10 on one of my computers and I've been quite impressed. And now I've got Windows 10 on my "proper" machine, my Surface Pro 3. It's very impressive. Boots fast and the user interface improvements make a huge difference. My advice for would-be migrators.
It will be very interesting to see where Windows 10 ends up. And I reckon that you really should go along for the ride.
Rob Miles is technology author and educator who spent many years as a lecturer in Computer Science at the University of Hull. He is also a Microsoft Developer Technologies MVP. He is into technology, teaching and photography. He is the author of the World Famous C# Yellow Book and almost as handsome as he thinks he is.
Begin to Code with JavaScript is now available for purchase and download. You can find it here