Wrapping temperature sensors

One of the things we discussed last night at our Meetup was the our air quality sensors. We started out with four sensor three years ago, in locations around Hull. All the ones still in place are still working, but they have fallen foul of the recent heatwave.

The temperature sensors are wrapping round when the temperature gets above 40 degrees. To save space in each LoRa message the temperature data is restricted to a range of -24 to +40. This gives a range of 64 which can be expressed in six bits. As you can see above, this doesn’t work too well when things get really toasty.

I think we could use some cunning code to figure out what that temperature should be, even though it has wrapped around. However, the next version of the code is will need to be changed to handle these high temperatures that we are now seeing.

Return of the Air Quality Sensor

This week I got a call from John who has been building some more air quality sensors for deployment around Cottingham. These connect via WiFi and are designed to wake up, sample the data, and then go back to sleep for a while. Such are my data management skills that it took me a few minutes to find the original files and build the firmware. My software worked fine, but it looks like the BME280 sensors that we are trying to use are not working. I’ve seen this problem with these before. People are quite happy to label all kinds of other devices as BME280 compatible, or change the I2C addresses of them. Anyway, hopefully we’ll get some working ones soon and do a bit more air quality monitoring.

Air Quality sensor autopsy

Actually, it’s a bit unfair to call it an autopsy, what with the sensor not being dead. I applied some power and it sprang into life, producing readings that seemed quite sensible. The components that had suffered the most were the four screws that held the lid on. I thought these were galvanised steel, but they are now very rusty steel, to the point where one screw head has pretty much disappeared.

However, once I got the lid off I discovered that the internals look pretty much like new. There is a bit of burn-in on the OLED screen (you can see it on the top right hand corner) but everything else looks fine. The waterproof case has done a good job of protecting the innards. The air quality sensor is only turned on a few times each hour to take readings, and it worked fine giving reasonable readings.

This is the air inlet. I was expecting to see more blockage than this. The filter we used was an inlet filter for a washing machine hose which we glued into place, and it seems to have done a good job of keeping out creepy crawlies. The next thing might be to take the air quality sensor to pieces and take a look at the state inside that. The sensor fan sounds fine, so it might be good for a while longer. From this assessment it looks like we can build things, stick them on lampposts and have them survive for a useful amount of time.

The sensor that came in from the cold

sensor 03.png

This is Sensor03. It has spent the last couple of years attached to a building in Hull, transmitting environmental and air quality data to our server. I’m going to compare the output from the 2 year sensor with that from a new one and see if it has aged much. Then I’m going to take it to pieces and see what the insides look like.

I’m quite pleased with the way that the code and hardware has kept going all this time. You can take a look at the output from the remaining three sensors (plus some others) here.

Sensor Inside.jpg

This is what the sensor used to look like inside, I wonder if it will have changed much?

James Bond Python

There’s always a moment in a spy film when someone says “I’ll just hack into their network and reconfigure it….” Today I did this for real. I suppose I was hacking my own network, but it still felt a bit like James Bond.

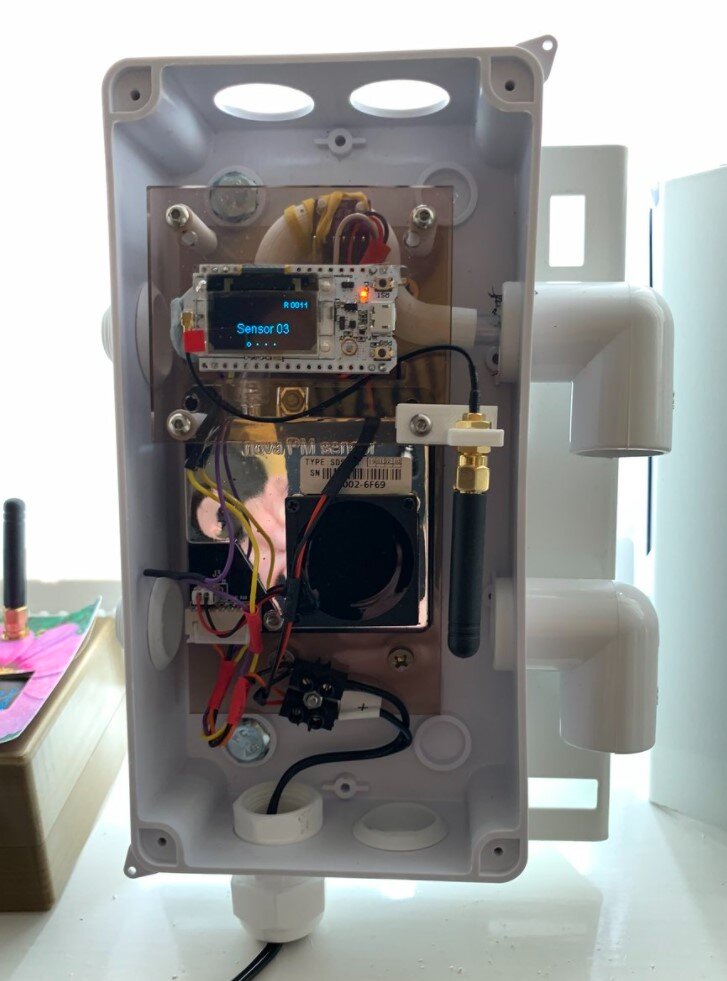
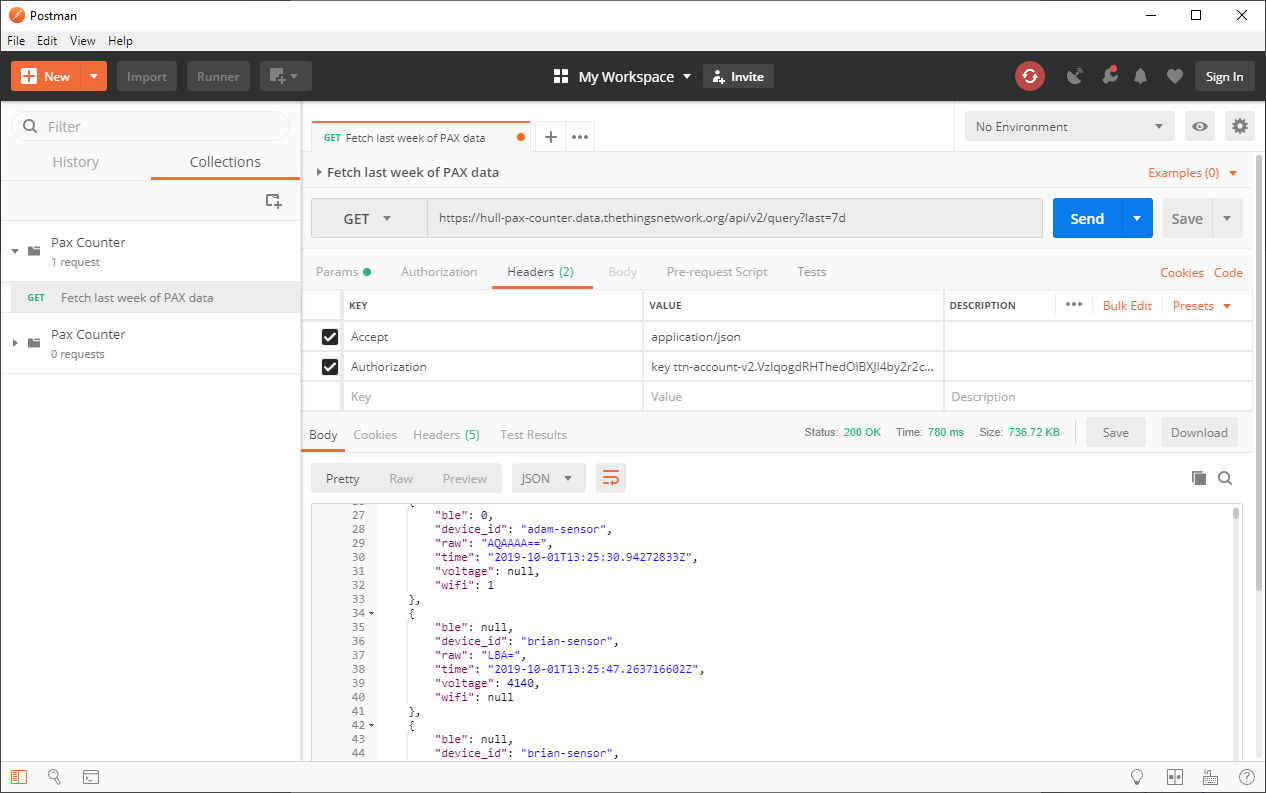
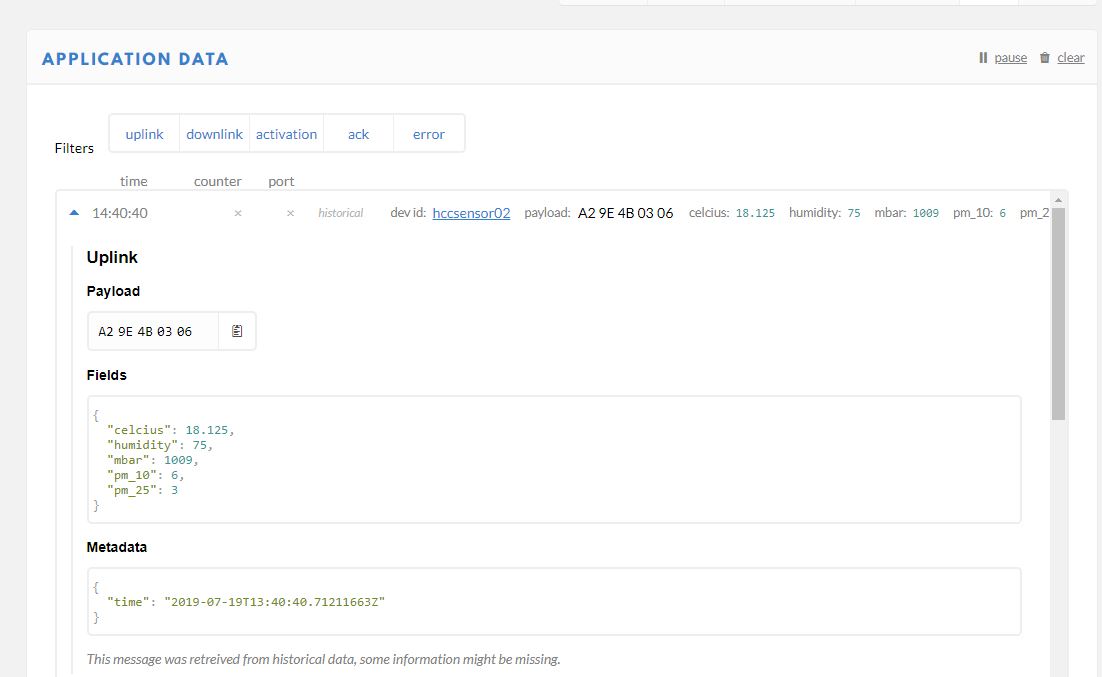
I was fixing one of our sensors on our Connected Humber network. These all use MQTT to send readings back to the server which then displays them on a map. The problem was that when I set up the sensor I’d set the publish topic incorrectly, so the readings were being sent to the wrong place. I needed to change that topic remotely.

Fortunately my sensor code can accept configuration commands, so this should have been an easy fix. Just send the appropriate message. The snag was that once the sensor has sent a reading it then goes into a deep sleep to save power. So it is hardly ever around to hear any messages. However, I’d built a delay into the software so that it stays running for a couple of seconds after it has sent a reading.

All I had to do was wait until I saw a message and then quickly send the configuration command. This seemed like a bit of a waste of time, and at my age there is no guarantee that I’d have the required ninja reactions that would allow me to send the message in time. So I wrote a bit of Python instead.

The program turned out to be simple enough. It just waits for an incoming message and then sends one straight out as soon as it sees it. The command that I sent was “Don’t go to sleep after each transmission”. Then I was able to configure the MQTT correctly, check a few other settings and finally put the device to sleep when I’d done it. And I really did feel a bit like a hacker in a spy movie while I was doing this.

I think I’ll build this out into a proper command transfer program. LoRa powered sensors work in exactly the same way, in that a LoRa device only listens for incoming messages after it has said something.

All Hail the Battery Monster

John came round to see me today. He’s been working on hardware for our environmental sensor. We’re hoping to put a few of these around the village to get a feel for particle counts and how they change over time. The aim has been to create something that can be left on a building for as long as possible and just work.

My experience with making these devices is that power is often your biggest problem. Our lamppost sensors have it easy because they can use a local power supply. But our devices are going to be self contained by the cunning use of sleeping software and the biggest batteries we can find. John has put together the above. It should run for a few months or more.

With a bit of luck we should have them out and about soon.

ESP32 Deep Sleep Mode

I'm very proud of the picture above. It shows that I'm getting around 0.1ma current consumption on our new environmental sensor when it is in deep sleep mode.

It's very easy to put an ESP 32 into deep sleep mode. This is the code that I'm using:

#define uS_TO_mS_FACTOR 1000  /* Conversion factor for micro seconds to miliseconds */

void sleepSensor(unsigned long sleepMillis)
{
    esp_sleep_enable_timer_wakeup(sleepMillis * uS_TO_mS_FACTOR);

    esp_deep_sleep_start();
}

The sleepSensor function is called with a parameter that gives the number of milliseconds for the sleep duration. It sets up a timer wakeup for that duration and then starts the deep sleep process.

The functions esp_sleep_enable_timer_wakeup and esp_deep_sleep_start are in the ESP32 library that is added to your program when you select a device based on the ESP32 processor. If you want to use them you have to include the Arduiono libraries by putting this statement at the start of your program:

#include <Arduino.h>

When the ESP32 "wakes up" at the end of the sleep the processor is restarted. The timing of the sleep duration is not particularly accurate, certainly not as accurate as the internal clock you get when the ESP 32 is running. You can make the wakeup trigger a button press rather than a timeout if you wish.

When an ESP 32 is restarted after a sleep all the varaibles are re-initialised. However, there is a way that your application can preserve some variable values in Real Time Clock memory. More of this later.

Flying Blind with the Heltec Cube

Now that I’ve got the Heltec Cube sending messages to the Things Network, the next thing to do was to get the device reading from my particle sensor. This was tricky because the sensor uses the one serial port on the Cube. That’s the same port as is used for programming and sending diagnostics. So I had to fly my code “blind”. Fortunately the Cube has a single neopixel on the board which I can control from software. And by using that, plus testing the code on another device first, I managed to get it working.

If you watch the two second video above you can see the pixel flash green when the message goes through. I’m very proud of that….

Achievement unlocked - soldering surface mount components

I did something today I’ve never done before. I soldered a couple of surface mount components onto our latest environmental monitor control board. They are the transistor and the resistor towards the top of the picture. The trick (at least for me) was to get one pin anchored and then work my way around applying a drop of solder paste to each terminal and then heating it up until it melted and formed the joint. I was using a hot air gun (not a very good one) and it took a while to heat things up but at least it worked.

The transistor will control the power to the particle sensor and make it possible for us to make a sensor that consumes only a tiny amount of power when it is not active.

Bonfire night particle counts

I thought that bonfire night would be interesting, and so it turned out. Above are particle counts from one of our sensors in Hull. From the looks of things most of the air particle action was in the days before bonfire night which kind of makes sense, bearing in mind that was the weekend. These numbers are not definitive (after all this is just one sensor) but I’ve seen similar changes in the readings on other sensors around the city.

You can find these readings and compare sensors on the sensor site here.

Using the Postman to fetch data from a Swagger Site

We’re using The Things Network to get data from our PAX (passenger) counters. We have Things Network application that receives Lora messages from our counters and we’ve added a data storage integration to hold the data from the counters. We’re not doing much with the data at the moment, but today I thought I’d try and get it out of the Things Network data store sot that I could play with it.

I was thinking that I might have to write a little application to make the request that fetches the data but it turns out that it is actually very easy to use The Postman to fetch the data for me. The Postman is a program that posts web requests and gets the result back for you. It’s great for testing and also for performing quick web requests when you can’t be bothered to write a program to do it. Which is what I’m doing.

If you ever need to do this too it’s actually quite easy. Just open up the integration from your application on the Things Network as shown above. Press the Authorize button in the top right and copy the application key from the application into the dialog that appears so that you can authenticate requests to the Swagger api. Then find the query that you want to run. Iin this case it is the query one you can see on the screenshot above.

Now scroll down to reveal more of the query settings. I’ve set the parameter to get the last 7 days of data. The Things Network only hold the data for 7 days, so this will fetch all of the data. If you hit the “Try it out” button the query runs and you will see the data appear in the browser. That’s fine, but it is very hard to do much with the data in a web page like this.

To use Postman you just have to copy some of the elements from the sample curl query generated by the web page into a new Postman GET behaviour. As you can see below I’ve set the url for the GET request to the Request URL above and added two header values to the request. These give the output format and the authorisation key.

When you click the Send button the request is sent and you can then save the response in a file. You can save the query for later use. Postman and swagger are a couple of technologies that it is worth learning a bit about.

The fault is never where you think it is. Never.

We’ve been having problems with my Air Quality sensor code not recognising a sensor properly. It’s the worst kind of problem; where mine works but the other one doesn’t.

Today we found out that the problem was that the supplier had sent a different model of sensor device. The good news is that I’ve not got a lot of extra diagnostic code in my driver that can probably notice this next time, or at least make it easier to discover. It all goes back to one of the irrefutable truths of debugging:

If what is happening is impossible it is either not impossible, or not happening.

Getting out my Top Hat....

I’m doing a talk tomorrow in Manchester for the Dot Net North group. So, of course, today I’ve started my preparations. I was very pleased to discover that the Air Quality Top Hat was actually working properly without me knowing. It had been secretly sending readings into Azure Tables without being asked, which was rather nice. I checked the data tables and discovered that when I’d been showing it off in July it had connected to the WiFi and pushed some data. Scary.

Anyhoo, I’ve got all the bits and pieces working and I’m looking forward to doing the talk.

Using TTN Mapper to show LoRa coverage

I’ve been playing with TTN Mapper. It’s great. There’s an app you can get for your phone (Android or IoS). You configure it with the details of your Things Network application and then you can wander round with a portable LoRa device and help to build a map of coverage.

You don’t have to actually connect your LoRa device to your phone, you just have to enable the mapper program on your phone to connect to your application and then it will detect LoRa packets from the device in that application and use the gateway metadata to help build the coverage map.

I’ve configured one of my Pax counter devices so that I can use it for mapping. Note that you need to be careful to put the sensor name in exactly as it is configured in the application. My iphone keyboard “helpfully” converted one of the characters in the device name to upper case and broke the mapping.

Some of the strings you have to enter are quite long. I opened up the Things Network site on my phone and then copied them out of the browser into the setup page of the application.

You can use a wildcard for the device name but this might get confusing if the mapper starts thinking that messages from distant sensors are actually with you and your iphone. But this would be a good way to work if you make a network with a single LoRa device that you are going to use just for mapping.

I’m going to try and get into the habit of taking the phone and a LoRa device with me whenever I go for a walk.

Server Discussions at c4di

We had a quiet, but useful, hardware meetup today at c4di. Although most of the talk was of servers and software.

We’re in the process of migrating our services onto a shiny new Azure platform (if virtual machines can ever be regarded as shiny). As of today we’ve got the bulk of the work done. This means that you can go to our map and see something useful. We made some changes to the configuration live at the meeting which was great fun. I also insisted that we turn off the server and then turn it back on again, so that we could make sure that there are no manually started services that we need that would cause things to break if we ever had a reset. I’m pleased to be able to report that the server passed with flying colours.

Next we have to move our web sites and a couple of other services and then we’ll back in business. Huge thanks to everyone, particularly Starbeamrainbowlabs and Brian, for making the move.

Starbeamrainbowlabs has written some neat blog posts on the migration process that you can read here.

Lamppost Sensors Live

Well, this is rather exciting. The air quality sensors that we handed over to Hull City council to be attached to lamp posts and measure air quality are now attached to lamp posts and are measuring air quality.

We didn’t expect them to show up on the network just yet, but thanks to one plucky LoRa gateway in the middle of Hull, three of the four sensors are getting readings into the servers.

The next step is to get the data onto our interactive map so that everyone can see what it looks like.