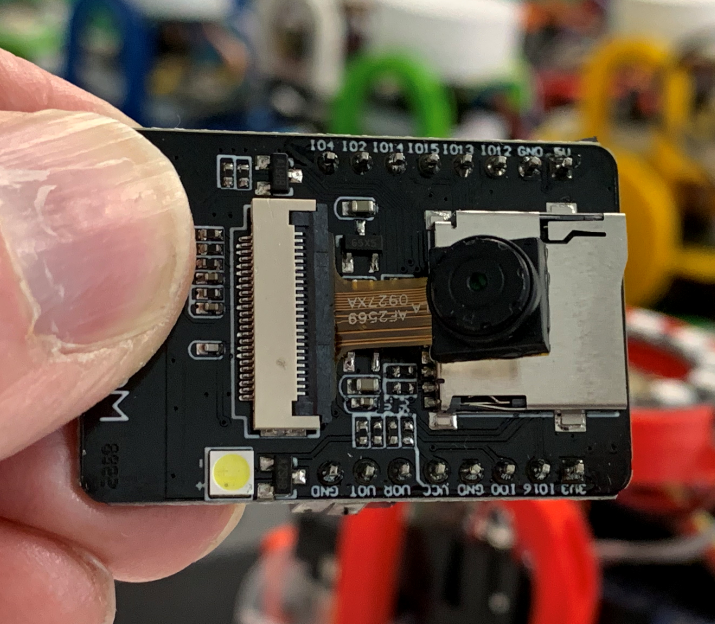
TTGO Camera

A while back I ordered a TTGO camera from Ali Express. It came today and it is lovely. It is similar to the ESP32 webcam that I bought a while back, but it has a PIR sensor and a BME 280 environmental sensor along with a nifty OLED display.

It is supplied with firmware that sets it up as an Access Point. If you connect to it you can view the image and control it from the web page that it serves out. I think it is running the same software as I loaded into the earlier device, but it is nice to have it on the device at the end.

It works extremely well. I’ve printed a little case for it from a design I found on Thingiverse and now I’m looking forward to having a play. They say it can do facial recognition, which is very interesting, and it might be a good device for our Humber Care Tech Challenge entry.

Update: I’ve found a nice blog post here on how to use this device as a fridge alarm. This shows how to put the processor to sleep and trigger wakeup using the PIR sensor.

Tensorflow for Arduino

At the DDD last week I was talking to a young lad who had been to my IoT talk and wanted to make a voice controlled device. At the time we talked I was thinking that this is the kind of thing that you would push into the cloud for processing. However, TensorFlow Lite is now a proper part of the Arduino libraries (you can just add it as you would any other device driver - search for Tensor).

One of the examples actually does voice recognition on the device. I’ve not found anyone who has got this working on the ESP32 but it would be wonderful if it was possible.

M5Stack and M5Stick

I’ve had a soft spot for the m5stack devices ever since I found them on AliExpress a while ago. They are really well packaged ESP32 based devices with high standards of production and design and a wealth of different add-ons and configurations. I’m on their mailing list and every week they seem to put out something interesting, whether it is a butterfly launcher or a fingerprint sensor. Their prices are at pocket money level for the most part and you can program their devices using Arduino C++, Python or a rather neat system called UIFlow which is block based but actually ends up being Python code.

This is the M5STack unit playing a game of scissors, paper, rock. It’s called an M5Stack because the base unit is 5cm in size. The stack bit is there because units and interfaces can be stacked together.

The M5Stack bit is the unit at the top with the LCD panel and three buttons. This unit is fitted into an M5Stack Faces unit which provides exchangeable face plates. The one shown is the keyboard, but there is also a calculator keyboard and a Gameboy faceplate too which comes into its own when you load up the NES emulator and play some games.

This is the M5Stick. It is even smaller than the stack and has a tiny colour LCD screen (which is presently showing Flappy Bird in play. It has fewer interfaces (although I’ve managed to connect an environmental sensor to it) and just one proper button to press.

Up until now if you wanted some M5Stack goodness you had to buy them from AliExpress, wait for them to arrive and sometimes pay import duty and VAT and sometimes not.

But this week I received an email from Cool Components telling me that they were now stocking M5 products. They are a bit more expensive than buying the devices directly from China, but they do arrive next day and you don’t get any nasty surprises with the price.

If you’re looking for a pleasing device with a lot of flexibility you should take a look at these.

Using Multiple Processor Cores on the ESP32

Most computers, particularly tiny embedded ones, have a single processor core. This means that they can do just one thing at a time. If you want a computer like this to appear to perform multiple actions at the same time it must execute a tiny “slice” of each action in turn to give the illusion of parallel activity.

However, the ESP32 has two processor cores, which means that it can run two “threads” of execution in the same program code. This has suddenly become very interesting to me, as I don’t want the LEDS to flicker when the computer controlling them has to go off and talk to the network.

It turns out that running tasks on different processors in the ESP32 is actually pretty easy. I used this guide here to get started. Then I slightly changed my program so that the code that drives the leds runs on one thread and the code that talks to the network runs on another.

It just worked. I was amazed. And there was no flicker on the display. One core in ESP32 is continuously running a function that redraws the display and the other core is waiting for network messages.

If you’re wondering how it all works, and whether you can get your hands on the code, I’m going to write a howto and put the whole thing on GitHub really soon.

Scrunching Text

I’ve actually got my display showing text now. This turned out to be a bit more difficult than I expected. Drawing text was easy, there’s a built in 6x9 font. But of course I wanted a bigger one, so I scaled the text to double size. Then I discovered that, because there are now two pixels between each character, the text wouldn’t fit on the screen. So I rewrote the display code to place each character individually and draw them only one pixel apart. Then I noticed that the redraw was a bit slow and made the display flicker. So I improved the driver to only draw changed characters rather than the entire text. And then I found that characters redrawn in the middle of a line overwrote a part of the characters next to them because they were now one pixel closer than they should have been. So I modified my draw function to redraw all the characters “downstream” of an updated character and put back the missing bits.

And now it works.

And I have another problem. The display is not “fire and forget”. It works because the computer controlling it is continuously clocking the red, green and blue data to turn on each pixel in turn. This means that when the ESP 32 goes off to read the WiFi and get the message to be displayed the whole display falls apart and, if I’m really unlucky, the whole thing crashes.

Oh well. I’ll leave that for tomorrow.

Led Panel Pax Indicator

This morning I was seized with a desire to make an indicator for the PAX counter device that I’ve been playing with. The counter sends the number of WiFi and Bluetooth devices that it has seen in the last minute up to The Things Network via Lora and I fancied making something that displayed that number.

A while back I had a play with a LED panel that looks rather nice. In fact I’ve got one stuck on my wall and I bought a few more at the time. So I got one out of the garage and set about getting it to work.

Last time I used a Teensy device but this time I thought I’d use one of the dirt cheap ESP32 devices that I’ve bought a few of. The hardware of the panels is actually quite simple. There are connections for red, green and blue (RGB) pixels and you just shift the pattern for row of pixels into these connections. There are four address bits you can use to select which of 16 rows you wish to control, and there are two RGB inputs, so you can drive two rows at the same time.

I used the library here to drive the panels from my ESP32. The panels are designed to be daisy chained so that you can send a row of pixels that spans a number of them. The library uses this to good effect by linking the outputs back to inputs so that all the colours can be regarded as one great big shift register. This reduces the number of pins that you need to allocate to drive the display, at the expense of a bit more wiring.

I’ve used what I call a “spatchcock” assembly method. Because the ESP32 is supplied with soldered pins I’ve had to solder onto these pins and then flatten them so that the device will fit inside the picture frame.

I’ve got it displaying pictures. Tomorrow I’ll try drawing some text.

Don't buy the wrong Heltec device

It turns out that I’m perfectly capable of making the same mistake twice. In fact, I seem to insist on doing this.

A couple of years I bought three Heltec devices that were configured for the American market. They worked fine, but only on the 433 MHz network that they use for Lora in the ‘states. For the UK and Europe you need 868 Mhz ones.

A while back Adam told me about a new Heltec Wireless Stick that looked interesting. I was intrigued, so I bought one. The product listing implied that it worked on all of the wavebands.

Mine doesn’t. It has 433 written on the box. It’s a nice enough device, but much less useful than I was planning.

Moral of story: check the transmit frequency of any LoRa device that you might think of buying.

Any Solar Power experts out there?

I went to a meeting yesterday with some folks who are interested installing some of our air quality sensors. However, we have a major problem with this because at the moment our devices are all mains powered. This is mainly because the particle sensor is quite a power hungry beast. It needs to be fed with around 120 milliamps. This is not a huge amount, but it is enough to make long term battery powered deployment a bit of a no-no.

It looks like there are some devices out there, I’ve ordered some of the one above, based on the MCP73871 chip. If anyone has ever used this kind of device and got a happy ending I’d love to hear from you.

Getting Started with Micro Python on ESP32

I got my little game working on the Raspberry Pi yesterday, and today I got to thinking how I could make it work on something a bit, er, cheaper. It’s not so much that I begrudge paying the price for the Pi, more that I can think of more demanding things to do with the Pi than just run the game. My thoughts turned to the ultra-cheap ESP32 devices that I’ve been playing with. The only snag is that I’ve written the entire game in Python for the Raspberry Pi, and I don’t fancy re-writing it in the C++ that these devices normally run.

So, why not run Pyhon on an ESP 32 device?

This turns out to be really easy. If you’ve installed ESP32 devices as part of your Arduino development environment you will have a useful little program called esptool.py on your machine. To convert a device to Micro Python you just have to plug in one of those ultra-cheap devices, find out what serial port it is connected to (in my case com4) and then use the command below to program the chip with Micro Python.

esptool.py --chip esp32 --port com4 --baud 460800 write_flash -z 0x1000 micropython.bin

This loads the image in the file micropython.bin into the device. To get a Python image, go to the download site and look for ESP32 devices. I used the one in the file esp32-20190714-v1.11-146-g154062d9c.bin

Above you can see what happened when I ran the command.

When you restart your ESP32 you will be able to talk Python to it via a command prompt. That’s fine, but what you really want is an IDE that lets you write and deploy Python programs.

The best one I’ve found is called Thonny. It’s works with “normal” Python nicely enough, but it also has an option you can use to point it at an embedded device:

In the options menu above I’ve told Thonny to search for a device running MicroPython and connect to that. Now, when I run a program it is deployed into the device and executes from there.

The MicroPython installation provides a tiny filesystem that can hold python programs. When you run a program it is transferred into that filesystem and runs from there. There are two special program files on the device, boot.py and main.py. The program in the boot.py file is executed when the device powers up, followed by the one in main.py The Thonny program has an option (in the Device menu) to save the program you are editing one of these files. This makes it really easy to make your Python program run when the device is powered up. I made my game program the main.py one and now I have my original Python program running inside a device that only cost around a fiver.

It wasn’t quite as simple as just copying the files over. The api (application programmer interface) to use GPIO ports and Neopixels are different in the two devices and I discovered that MicroPython does not provide a random.shuffle method. This meant that I had to create my own shuffling function, which wasn’t too hard.

Anyhoo, I now have my program running in Python on a tiny embedded device. Which is rather nice. I’ll put the code up on GitHub later this week.

Making a PAX counter

PAX counter and plastic pig

PAX is an abbreviation for “passenger”. A PAX counter is a device that counts passengers, although you could use it to count people in lots of other situations too. One way to count people is to detect the devices they are carrying. I’ve built the PAX device above from the code here. It’s based on the Heltec WiFi Lora device and I’ve printed a rather neat little case for it too.

It listens to Bluetooth and WiFi. It doesn’t eavesdrop on anyone, or log data packets, it just counts the number of different device addresses that it sees and then sends the totals over LoRa to an application.

If you want to build it my strong advice is to use Visual Studio Code running under Windows 10 and with the PlatformIO framework installed. I used this and followed the instructions carefully and the program built and deployed without much fuss. I did get one warning about a missing configuration for the LMIC but this doesn’t seem to matter. The device works fine and I’ve even managed to send control commands back into the device over LoRa.

If you want to get a rough idea of passenger traffic at a particular location then I can see it being a very useful device. I’m a bit worried about privacy issues though, in that while it would be very hard to go from the MAC addresses of my devices to actually identify me directly, it would be trivial to detect that the same person has been to a particular place multiple times. This might be considered an encroachment onto privacy.

Whether or not you use the data like this is really down to self-discipline as an individual programmer, but then again they are already doing this kind of thing in shopping centres…

More Heltec Fun

Welcome to the blog all about the Heltec Lora 32 V2 device that occasionally mentions Rob Miles.

Last night I was feeling quite pleased with myself because I reckoned that between us we’d solved all the problems relating to our Air Quality sensor. We’d picked hardware that seems to work, a case that seems the right size and even got a power supply that looks like it will cut the mustard. We’ve even figured out how to attach the box to a lamp post.

I should know not to think things like that. In my experience it is just at this point in a project when something that has been totally reliable suddenly breaks for no reason. So it was with our Air Quality sensor. The LoRa transmission code broke. The driver locked up after only having sent one packet. Since this has never gone wrong before it was a bit of a scary head scratcher. Just before I’m due to head off to Dundee for some external examining too. Oh well.

Last night I did the very best thing that I could. I stopped thinking about the problem and walked away from it for a while. And today, that approach paid off. Coming back to it fresh I decided to look for some known good code on the Heltec site. At which point I found the following little gem:

#if defined(V1)
const lmic_pinmap lmic_pins = {
    .nss = 18,
    .rxtx = LMIC_UNUSED_PIN,
    .rst = 14,
    .dio = {26, 33, 32},
};
#elif defined(V2)
const lmic_pinmap lmic_pins = {
    .nss = 18,
    .rxtx = LMIC_UNUSED_PIN,
    .rst = 14,
    .dio = {26, 35, 34},
};
#endif

This is the code that maps the pins on the LoRa device to the driver software. And it is different for Version 2 of the Heltec device. Just in the “.dio” element. These are the numbers that map the indicator pins on the LoRa chip to the software expecting to be told things like “the last packet has been sent” or “a new packet has just arrived”. With the wrong pins assigned my driver was getting stuck waiting for messages that would never arrive. I fixed the numbers and all is now well.

These issues haven’t dimmed my enthusiasm for the device, I still think it is rather neat. However, I’m going to compile a little document that sets out all the differences I’ve discovered between the two versions of the Heltec device. For myself, if nobody else.

Heltec Lora V2 I2C Pins Fun

I seem to be filling the blog with items about the difference between versions 1 and 2 of an embedded controller. But then again, someone might find this useful.

Anyhoo, my shiny new Heltec devices have broken another part of my Air Quality sensor, but this time in a good way. When I was using the previous version of the device I had to use to additional pins to implement the I2C connection to the BME280 environment sensor. In the new version we can use the same I2C connections as the OLED display, i.e. pin 15 for SCL and pin 4 for SDA. This works fine as long as you initialise the OLED panel before you initialize any other I2C devices.

Using the existing I2C controller frees up a pair of precious pins. You also get the benefit of a new Heltec version 2 feature. The device has two 3.3V outputs that can be controlled via pin 21. This means that your program can switch off the power to connected devices before entering deep sleep mode. You could also use this to perform a hardware reset of any connected device by turning its power off and on again. The power pins can’t deliver a huge amount of current, but it is nice to be able to control them in this way.

ESP32 powered webcam for 7 pounds

In my fingers above you can see something rather amazing. It’s an ESP32 powered webcam and it is priced at a stupidly low level. Mine arrived earlier this week and I’ve found a splendid howto that gets you started. You’ll need a serial interface to program the camera as it doesn’t have a usb connection. I used the one I got with some Arduino Pro-minis a while back. A couple of tips:

  • make sure you update to the latest version of the ESP32 board. The older camera sample will not compile.

  • the device can be a bit picky about power supplies. Mine gave “brownout” warnings for a while before I connected the 5V input to a slightly beefier supply than the 3.3V I used to program it

The camera serves up a website with a wealth of controls that you can use to change the image quality. You can use it to grab stills or watch a video stream. It even supports facial recognition and it has a micro-SD slot for saving stuff to. Amazing.

For the price you really should get one of these and have a play. I’ve been looking for a quick way to get pictures into Azure for training image recognition. I think I may have just found it.

Crippled Hexabot

Ages ago (well, four years) I made a hexabot from a kit. Today I thought I’d get him out with a view of adding some sensors and an ESP32 to make him a bit more autonomous. He was a bit lame. Two of his servos had stopped moving. Fortunately I had some spares and so I set about getting him walking again.

It didn’t go well. I broke a replacement servo finding its mid point and fitted the second one upside down. Twice. I think that a few hours of gardening has destroyed my ability to work with electronics.

However, I think he is now back to his sprightly best. I’ve ordered a camera pan and tilt (around 3.50 with servos) and a distance sensor with pan mechanism (also around 3.50) from AliExpress. Looking forward to them arriving.

Photographing circuits

I’m writing some embedded development content and having great fun doing it. I need to take pictures of the hardware during construction. In the past I’d be reaching for a proper camera, but nowadays I use the camera on my phone. The quality is very good and a tiny phone camera has a depth of field that makes sure that everything in the picture is nice and sharp. It’s also rather nice that the pictures on the phone are sent straight up to my Onedrive camera roll where I can just pull them out and drop them into the document I’m writing.

Air Quality Fun at Leeds Sharp

Some of the audience at the start. Note my lovely Surface Go running the whole thing…

Had a great time at the Leeds Sharp meetup tonight. I was there to talk about Air Quality, Azure Functions and Lora. With a guest appearance of my Air Quality top hat. I’m pleased to be able to report that every demo worked. Even the impromptu one that I wasn’t expecting to…If you want a look at the slide deck you can find it here.

One of the lovely things about the night was that the first two folks that I saw at the venue were a couple of Hull alumni, Joshua and Andrew . They were there to make a video of the event. So they did. It’s really good, they’ve caught the presentation content along with some shots of me prowling around looking nervous. I think I’ll hire them for all my events. They’ve put the video on YouTube, you can find it below.